Table of contents
- 1. 10.11.1 Utilizing SecureNAT to Make Things More Convenient
- 2. 10.11.2 Using SecureNAT For Amazingly Simple, Secure Remote Access With No Administrator Rights
- 3. 10.11.3 A Practical Example Network
- 3.1. Network Layout Example
- 3.2. Purpose
- 3.3. Preliminary Preparation
- 4. 10.11.4 Starting Up VPN Bridge on the Remote LAN
- 5. 10.11.5 Using Remote Access
- 6. 10.11.6 SecureNAT and Security
- 7. 10.11.7 The Dangers of Misusing SecureNAT
- 8. See Also
Before, administrator rights were a necessity when setting up a remote access VPN. But by using the SecureNAT capability built in to SoftEther VPN Server and SoftEther VPN Bridge you can build a remote access VPN that does not require administrator rights but retains all of the same functionality. This section will explain how to use SecureNAT to enable you to access your LAN from a remote location.
10.11.1 Utilizing SecureNAT to Make Things More Convenient
About SecureNAT
As explained in section 3.7.1 What is SecureNAT?, SecureNAT consists of the TCP/IP stack operated in user mode and Virtual NAT/Virtual DHCP Server. In particular, when IP access via Virtual NAT is performed the data is automatically relayed to the host using Socket API at the user level. This is a very advanced and intriguing technology.
Accessing an Extremely Secure LAN Via Remote Access That Was Not Possible With Previous Technologies
As explained in section 10.4 Build a Generic Remote Access VPN, to set up a VPN to allow remote access to an existing LAN from a remote location you must first install VPN Server on the LAN you wish to connect to remotely. In addition, that VPN Server must be able to be seen from the Internet. Finally, use local bridging to connect the Virtual Hub to the physical LAN and your remote access VPN is complete. This type of configuration will allow you to connect to an existing LAN remotely, but you will need system administrator (or network administrator) rights to complete the set-up in the following two locations:
- When using the local bridge functionality to make a bridged connection between the Virtual Hub and the existing LAN you will need system privileges or administrator rights on the computer you install VPN Server to in order to execute the vpnserver process in service mode or user mode.
- To enable access to the VPN Server from the Internet you will need to have a global IP address or configure your NAT or firewall to enable port forwarding to your VPN Server. You will need network administrator privileges to perform this configuration.
Therefore, if you want to enable secure and easy remote access to a device you have installed or are managing on a LAN, you will not be able to use VPN Server to set up a remote access VPN server as you would normally because you will need both system administrator and network administrator privileges on that LAN.
10.11.2 Using SecureNAT For Amazingly Simple, Secure Remote Access With No Administrator Rights
Your network environment must meet the following criteria to set up a remote access VPN using SecureNAT. Please refer to section 3.7 Virtual NAT & Virtual DHCP Servers for more information about the SecureNAT functionality.
- There must be a computer running Windows, Linux, FreeBSD, Solaris, or Mac OS X that you can log on to as at least a general user on the LAN you wish to connect to remotely.
- Also, you should receive confirmation from your network or system administrator that it is OK to access the LAN remotely before you begin setting up anything.
Normally, a LAN that meets the above conditions but consists of private IP addresses behind a NAT, firewall, or proxy server can not be connected to from outside the network. However, by utilizing the revolutionary new SecureNAT technology available only with SoftEther VPN you will be able to connect to even this type of network freely and securely from a remote location.
10.11.3 A Practical Example Network
Network Layout Example
In order to make the explanation in this section easier to understand, the method described here is for the sample network layout shown in the image below.
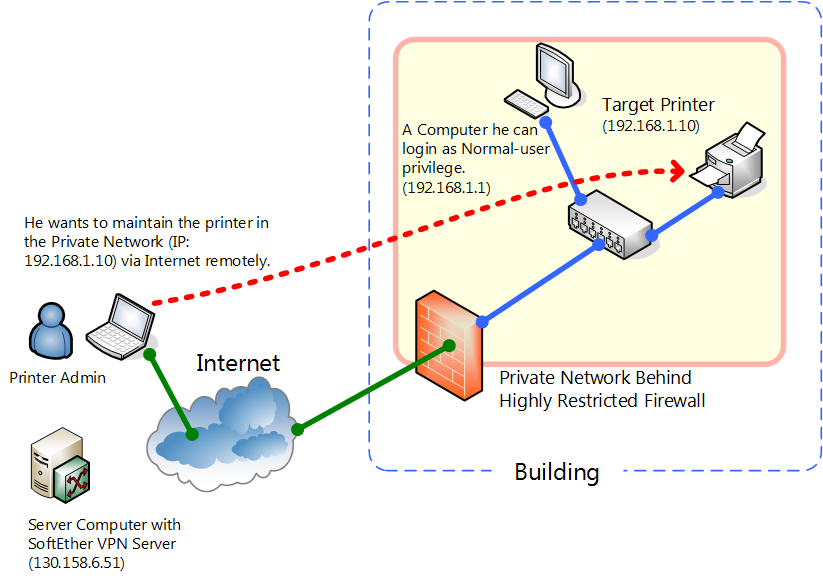
Network Layout.
First, there is a very secure network protected by a firewall or NAT that can not be accessed from the Internet. For this example, the network's IP address is 192.168.1.0/24. However, web sites can be viewed on the network by routing traffic through the firewall or NAT proxy server first. Also, the computer at IP address 192.168.1.1 is running Linux, although any other operating system that will run VPN Bridge such as Windows or Solaris is also acceptable. Assume that you do not have root access to this computer, but can log on to it as a general user. There is also a laser printer connected to the network at 192.168.1.10 that needs to be maintained.
Purpose
The reasons for using SecureNAT in the example network layout above are the following:
- You will be able to perform remote maintenance on the laser printer at 192.168.1.10 on the network 192.168.1.0/24 which normally blocks all connections from the Internet.
- If you explain to the administrator of 192.168.1.0/24 the situation and receive permission to set up such a VPN, but are worried about costs or the difficulty of changing the network's firewall settings, you can still set up the VPN without modifying the firewall.
Now we will explain in detail how to perform remote maintenance on the laser printer at 192.168.1.10 once you have reached this point in setting up the VPN.
Preliminary Preparation
The computer you set up with VPN Server beforehand at the IP address 130.158.6.51 is the VPN Server computer. Create a Virtual Hub on this VPN Server (the default Virtual Hub "DEFAULT" will do) and create a user so that you can connect to that Virtual Hub later through VPN Bridge (assume you make the user "test" with password authentication for this example). Please refer to section 3. SoftEther VPN Server Manual for more information about configuring VPN Server.
10.11.4 Starting Up VPN Bridge on the Remote LAN
Configuring and Starting Up VPN Bridge
First, you will need to physically visit the remote LAN (in this case, the LAN that contains the laser printer for remote maintenance at 192.168.1.10) at least once for the initial configuration process.
What you will need to do here is to log in as a general user to the Linux computer with the IP address 192.168.1.1 and install SoftEther VPN Bridge.
VPN Bridge is free to use if you just want to use it to connect to VPN Server. After unpacking the VPN Bridge Linux install package's tar.gz file and installing VPN Bridge on the computer at 192.168.1.1, the executable file vpnbridge will be created. (See section 9.3.3 Checking the Required Software and Libraries, 9.3.4 Extracting the Package and 9.3.5 Creating an Executable File.)
Assuming that you can only log on to 192.168.1.1 as a general user, you will have to run VPN Bridge in user mode. As shown below, run vpnbridge with the start option. Please refer to section 5.2.2 User ModeEdit section for more detailed configuration information.
$ ./vpnbridge start |
This will launch VPN Bridge on the computer at 192.168.1.1. To launch VPN Bridge under Windows, use the /usermode option, not the start option.
Beginning the Initial Configuration of VPN Bridge
Next you will configure VPN Bridge using VPN Server Manager or the command line management utility vpncmd. If there is a Windows machine elsewhere on the network but an explanation is not given on how to configure something with VPN Server Manager, you can perform the same methods as described for vpncmd on a UNIX machine. Please refer to section 6. Command Line Management Utility Manual for more information about vpncmd.
First, launch VPN Server Manager.

VPN Server Manager.
Next, when you click [Create New Setting], the [Create New Connection Setting] window will appear. In the [Host Name] field of this window, input 192.168.1.1, the IP address of the computer you ran VPN Bridge on earlier. Click [OK].
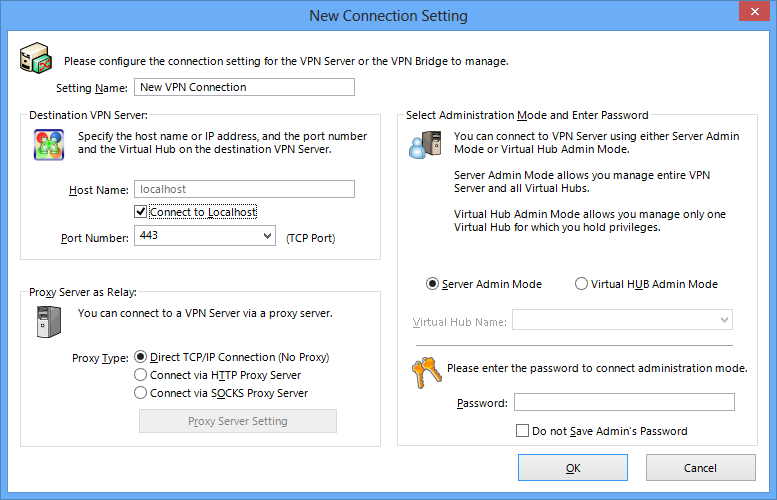
Creating a VPN Bridge Connection Configuration.
If you double-click the connection configuration you just made, an administrative connection will be made to the VPN Bridge and the administration window will be displayed. If this is the first time you have connected to the VPN Bridge, a message asking you if you would like to set an administrator password will appear. Set a password at this time.
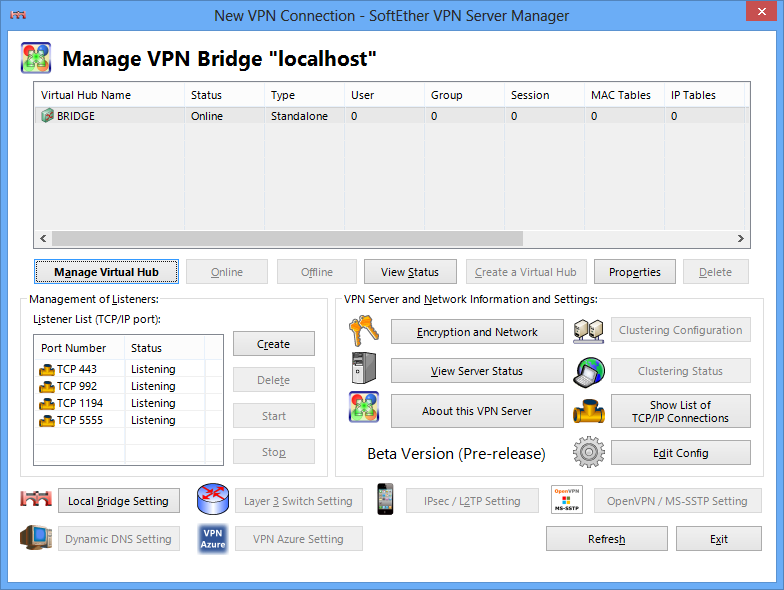
Connection to the VPN Bridge Completed.
Enabling SecureNAT
Clicking the [Manage Virtual Hub] button on the administration window will display a window labeled [Management of Virtual Hub - 'BRIDGE'].
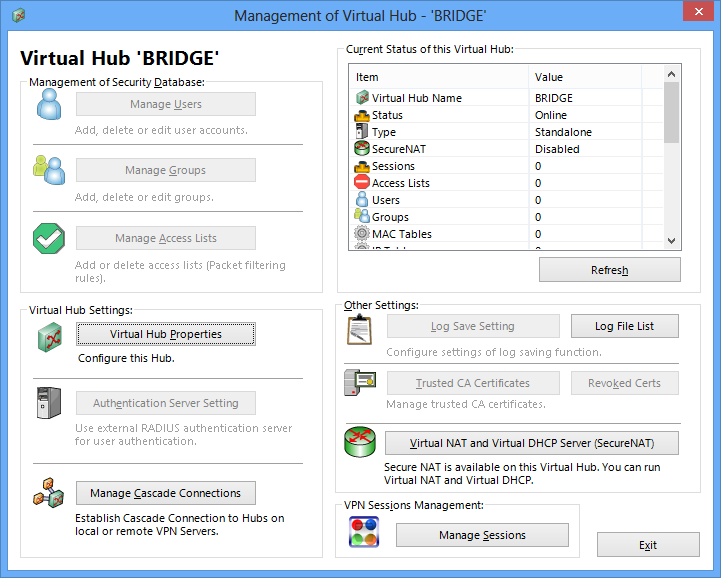
The Virtual Hub Administration Window.
On this window, click the [Virtual NAT and Virtual DHCP Server (SecureNAT)] button. This will display the [Virtual NAT and Virtual DHCP Function (SecureNAT) Setting] window. After reading the notices on this window carefully, click the [Enable SecureNAT] button.
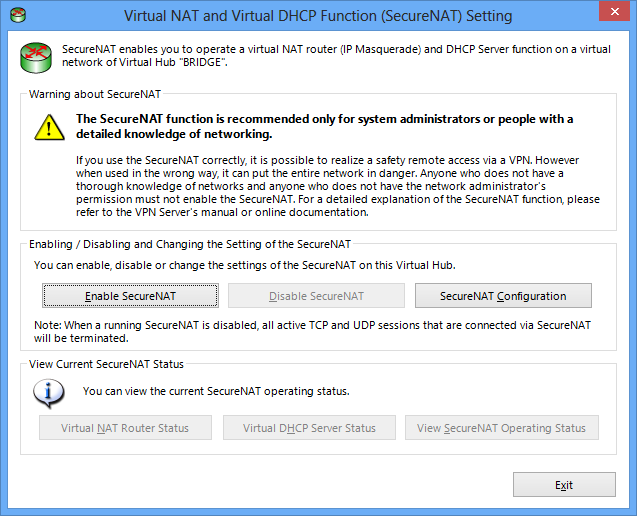
Enabling SecureNAT.
Now click the [Exit] button. This will take you back to the [Management of Virtual Hub - 'BRIDGE'] window.
Configuring the Cascade Connection to the VPN Server On the Internet
Next click the [Manage Cascade Connections] button. Then click [Create]. A window labeled [New VPN Connection Setting Properties] such as the one below will be displayed.
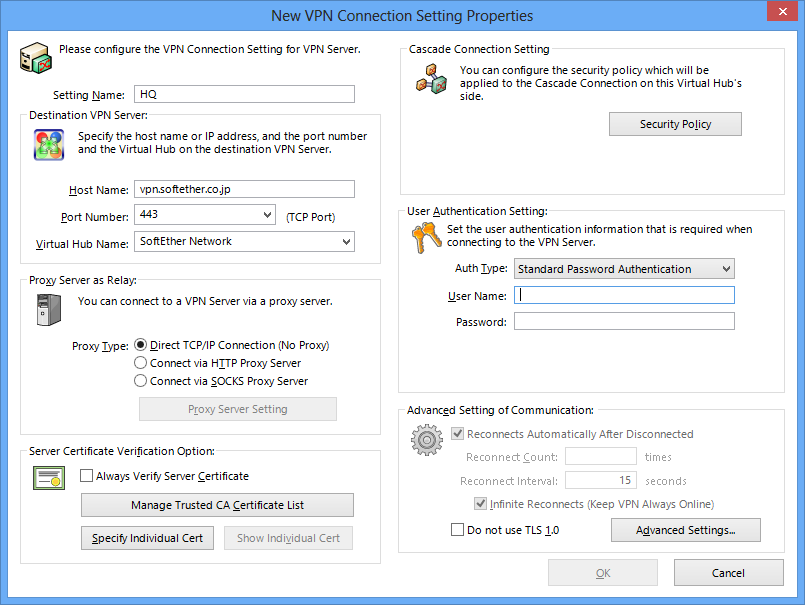
Configuring the Cascade Connection to the VPN Server On the Internet.
You will input the following items in the [New VPN Connection Setting Properties] window:
-
[Setting Name]
Designate some arbitrary name such as "Bridge". -
[Host Name]
Input the IP address of the computer that you installed VPN Server on beforehand. (In this example, 130.158.6.51.) -
[Port Number]
Input one of the listener ports of the computer that you installed VPN Server on beforehand. We recommend using port number 443 if you have to go through any firewalls or proxy servers. -
[Virtual Hub Name]
Input the name of the Virtual Hub you created on the VPN Server beforehand. -
Proxy Server Related Items
If you must go through a HTTP proxy server or SOCKS proxy server to access the Internet on the 192.168.1.0/24 network, you would enter all the information about that proxy server here. (See section 4.4.1 Selecting the Proper Connection Method.) -
[Auth Type]
Input the authentication method used for the user registered to the Virtual Hub (in this example, the user "test") on the computer that you installed VPN Server to beforehand. "Standard Password Authentication" should be sufficient under any normal circumstances. -
[User Name]
Input the user name of the user registered to the Virtual Hub (in this example, the user "test") on the computer that you installed VPN server to beforehand. -
[Password]
Input the password of the user registered to the Virtual Hub (the one you registered beforehand).
After you have entered all the necessary information, click [OK]. This will take you back to the [Cascade connection on Bridge] window. The connection configuration you just created should be shown in the cascade connection list.
Starting the Cascade Connection
Now, click the new connection configuration you just created and click the [Online] button. If, after a few moments, the connection status changes to [Online (Connection Established)] then a connection has successfully been made to the Virtual Hub on the VPN Server you set up on the Internet. If an error message is displayed look up the details of the error and solve the problem.
Once you have finished all the configuration and the cascade connection has successfully established a connection, close VPN Server Manager.
Now you have completed all the necessary configuration on the remote LAN (192.168.1.0/24).
10.11.5 Using Remote Access
Now that you have completed all the configuration, you will be able to access the 192.168.1.0/24 network anywhere on the Internet through the computer running VPN Bridge.
Now you can make a connection from VPN Client on a computer that is connected to the Internet to the VPN Server (in this example, 130.158.6.51). That computer will then be connected as a single segment to the remote network via the SecureNAT Virtual NAT and Virtual DHCP Server functionality of the VPN Bridge (192.168.1.1) you set up earlier on the VPN Server's Virtual Hub.
Therefore, the VPN Client's Virtual Network Adapter will automatically receive a private IP address to be able to communicate only with computers on the network at 192.168.30.0/24 from the Virtual DHCP Server. The default gateway will also automatically be set to the SecureNAT's Virtual Host. This makes it possible to perform TCP/IP packet communication on the network that VPN Bridge is running on via the SecureNAT functionality enabled on that VPN Bridge.
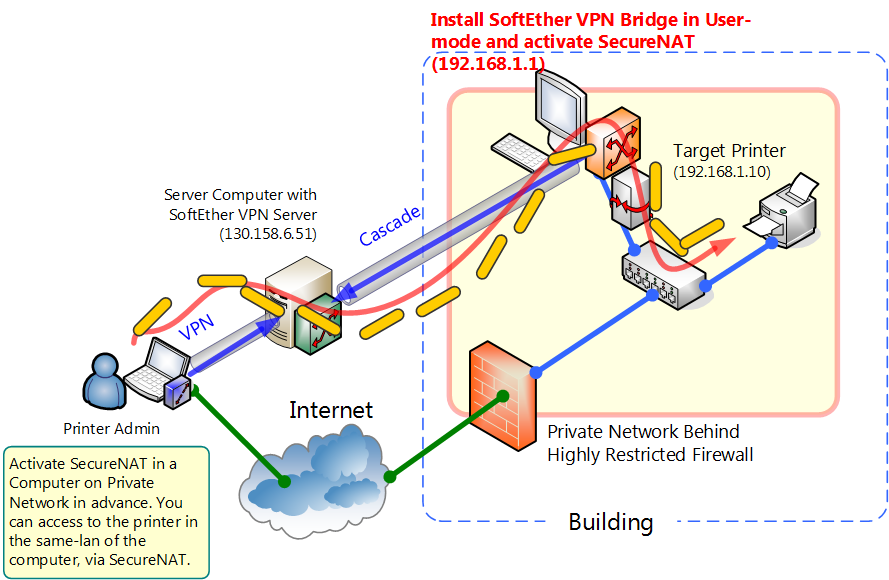
Remote Access Via SecureNAT.
Once you have confirmed that you have received an IP address via SecureNAT running on the VPN Bridge, you should now check to see if you can connect to and communicate with the laser printer at 192.168.1.10 as if you were physically on the network. This communication is entirely handled by the Virtual NAT functionality running on the VPN Bridge. The user mode TCP/IP stack automatically performs all accesses using streamed Socket API, communicates with the physical host with user mode privileges only, and receives those results.
Keep in mind that the Virtual NAT provided by the VPN Bridge on the remote network will be the default gateway to the VPN client computer in order to successfully allow remote access to that network. Therefore, when connected to the VPN any access to the Internet will not be directly performed by the client computer, but will instead be routed through the remote network. (If the remote network is another company's network, you should be especially careful as any Internet communication may be read or manipulated by a third party due to the information being routed through the remote network.)
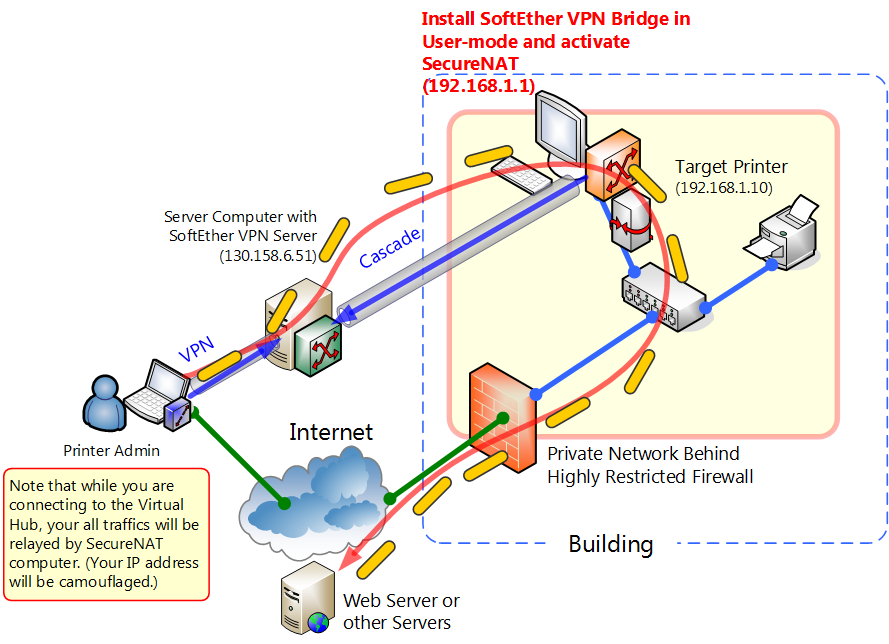
Packet Flow When Accessing the Internet Via SecureNAT.
10.11.6 SecureNAT and Security
A remote access VPN that combines VPN Bridge and SecureNAT such as the one in this example has the following security benefits:
- SecureNAT utilizes many complicated techniques such as user mode TCP/IP stacks, but all processes required by SecureNAT can be executed in user mode. Therefore, in a network such as the example network given here where VPN Bridge is running under general user privileges, only processes that can be executed under that user's privileges can be performed, even if a buffer overflow or other such error occurs in VPN Bridge's or SecureNAT's program code. This means that, compared to a setup which requires VPN Bridge to be run under system privileges, one that runs under general user privileges has increased overall system integrity.
- Of course, even when setting up a remote access VPN such as the one in this example that uses a combination of VPN Bridge with SecureNAT and VPN Server, all data under the SoftEther VPN protocol is encrypted via SSL by default. Even if you are sending data over the Internet, you will not have to worry about any third parties stealing or modifying the data you are transferring. You can also use server certificate authentication when making a cascade connection to the VPN Server (see section 3.4.12 Server Authentication in Cascade Connections for more details) to increase the security of your VPN even further.
- This example shows how to set up a remote access VPN without having to change any of the firewall or NAT settings on the remote network. Generally, making modifications to a firewall or NAT to allow traffic to pass through certain ports can not only be a costly procedure, but can introduce new security risks to your network as well. Therefore, this method is not recommended unless you have absolutely no other choice. If you have a similar situation where you have received permission from the network or system administrator to set up a remote access VPN, but there is concern over the cost, security risks, or firewall/NAT configuration, the method given in this example of using SecureNAT and VPN Bridge together offers a simple, cost effective solution for your remote access needs.
- All traffic that passes through SecureNAT is accurately logged in the security log file of the Virtual Hub on the VPN Bridge (or VPN Server) running SecureNAT.
10.11.7 The Dangers of Misusing SecureNAT
As explained above, you now know that by using SecureNAT with VPN Bridge and VPN Server and running the proper software ahead of time you can connect to any network that has access to the Internet from the Internet remotely. Before the new technology introduced in SoftEther VPN, it was very difficult to set up a Virtual Hub with SecureNAT that could communicate with a physical network.
However, be aware that mistakes made when using or configuring SecureNAT can lead to large security holes in your network. If you are thinking of setting up a network such as the one in this example that allows for remote access via VPN technology, please explain everything to your network or system administrator and get their permission beforehand. If you do not understand the principles behind SecureNAT, or are not familiar with TCP/IP or NAT in general, you should not use the SecureNAT functionality.
Due to potential security hazards do not use SecureNAT in the following ways:
All of the methods of use described above could be illegal under certain circumstances. |
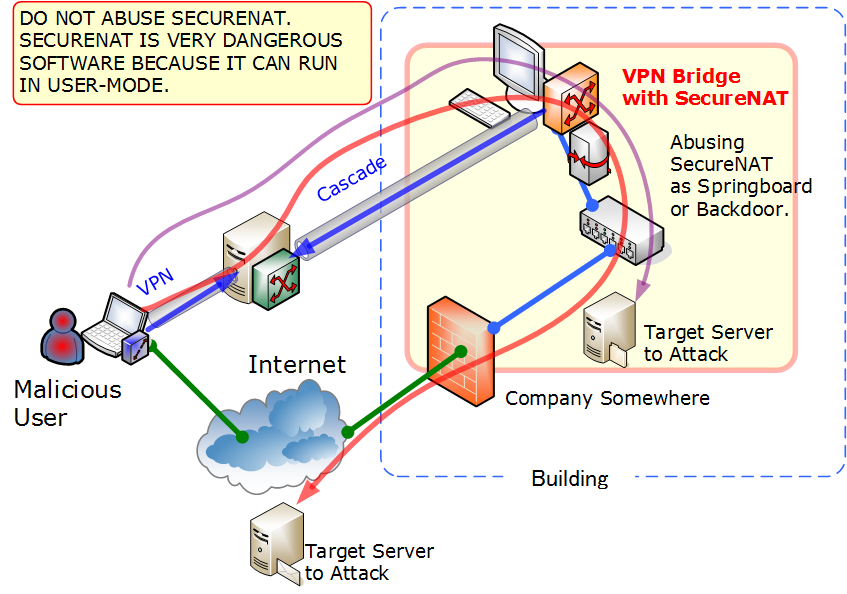
Forbidden Usages of SecureNAT.
See Also
- 3. SoftEther VPN Server Manual
- 3.4 Virtual Hub Functions
- 3.4.12 Server Authentication in Cascade Connections
- 3.7 Virtual NAT & Virtual DHCP Servers
- 3.7.1 What is SecureNAT?
- 4.4 Making Connection to VPN Server
- 4.4.1 Selecting the Proper Connection Method
- 5.2 Operating Modes
- 5.2.2 User Mode
- 6. Command Line Management Utility Manual
- 9.3 Install on Linux and Initial Configurations
- 10.4 Build a PC-to-LAN Remote Access VPN