Table of contents
- 1. 4.4.1 Selecting the Proper Connection Method
- 2. 4.4.2 Direct TCP/IP Connection
- 3. 4.4.3 Connection Via HTTP Proxy Server
- 4. 4.4.4 Connection Via SOCKS Proxy Server
- 5. 4.4.5 Server-Certificate Verification
- 6. 4.4.6 Selecting a Virtual Network Adapter
- 7. 4.4.7 User Authentication Setting
- 7.1. Selecting the Type of User Authentication
- 7.2. Information Required for Anonymous Authentication
- 7.3. Information Required for Standard Password Authentication and RADIUS or NT Domain Authentication
- 7.4. Information Required for Client Certificate Authentication
- 7.5. Information Required for Smart Card Authentication
- 8. 4.4.8 Use of the Smart Card Authentication
- 9. 4.4.9 Automatic Reconnection Function
- 10. 4.4.10 Connection Status and Error Message Displays
- 11. 4.4.11 Advanced Communication Settings
- 12. 4.4.12 Number of TCP/IP Connections for VPN Session Communications
- 13. 4.4.13 Interval Between TCP Connections and Length of TCP Connection
- 14. 4.4.14 Half-Duplex Mode Option
- 15. 4.4.15 SSL Encryption Option
- 16. 4.4.16 Data Compression Option
- 17. 4.4.17 Selecting the Connection Mode
- 18. 4.4.18 Routing Table Rewrite Process
- 19. 4.4.19 Startup Connection
- 20. 4.4.20 Exporting and Importing Connection Settings
- 21. 4.4.21 Creating a Shortcut for a Connection Setting
- 22. 4.4.22 VPN Server and VPN Bridge Cascade Connection Setting
- 23. See Also
After installing SoftEther VPN Client and creating a Virtual Network Adapter, configure a connection setting to connect to the Virtual Hub of the desired SoftEther VPN Server. This section describes the information that must be entered when creating a connection setting.
The settings described here are, for the most part, the same as the settings used to configure a cascade connection to VPN Server or VPN Bridge on a separate computer using the Virtual Hub of VPN Server or VPN Bridge described in 3.4 Virtual Hub Functions. The windows for editing the connection setting of the cascade connection and VPN Client are nearly the same, and the resulting operations when the connection settings are edited are also the same. Refer to the information described here when configuring a cascade connection.
4.4.1 Selecting the Proper Connection Method
Creating a Connection Setting
At the time SoftEther VPN Client is installed, no connection settings exist. To establish a VPN connection to SoftEther VPN Server, you must create a connection setting. To create a connection setting, select [New Connection Setting] on the [Connect] menu of VPN Client Manager. Hereafter, explanations on creating a connection setting and editing the settings assume this window is open.
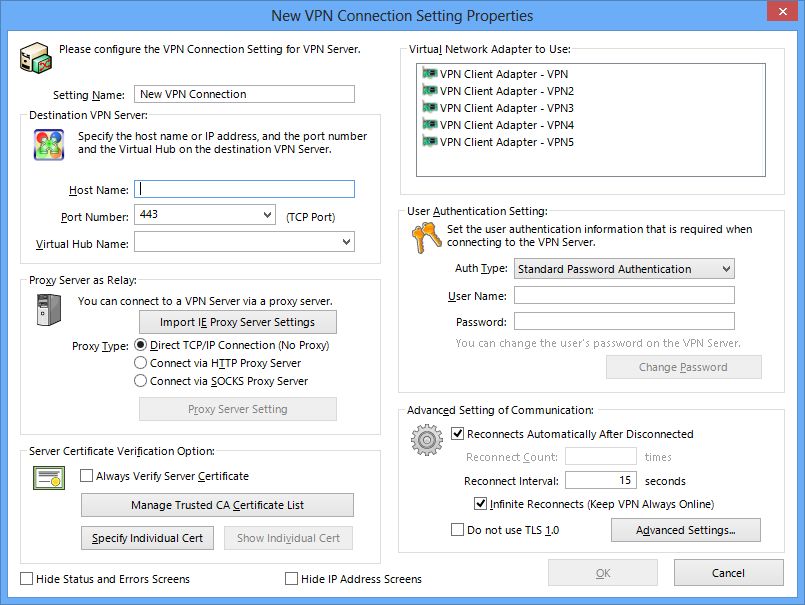
Window for Creating and Editing a Connection Setting.
To connect the computer with SoftEther VPN Client installed to the Virtual Hub of the desired SoftEther VPN Server, first you must click [Import IE Proxy Server Setting] to import Internet Explorer's setting, or select the proper connection method according to the network environment of the client and server computers. Select the connection method in the [Proxy Server for Relaying] field. When using a proxy server, click [Proxy Server Connection Setting] and enter the required parameters.
Choose from the following three connection methods.
- Direct TCP/IP Connection
- Connection Via HTTP Proxy Server
- Connection Via SOCKS Proxy Server
Specifying the Destination VPN Server
Regardless of the connection method, you must correctly enter the host name, port number, and Virtual Hub name of the destination VPN Server. The default port number is 5555, but you can specify any TCP/IP port waiting for incoming connections as the listener port on the destination VPN Server. When connecting via an HTTP proxy server or when using high firewall settings, consider using 443 (port for HTTPS access). For more information about setting the port number, please contact the VPN Server administrator.
4.4.2 Direct TCP/IP Connection
Use a direct TCP/IP connection in an environment where only direct IP routing can be used to establish an IP connection between the VPN client computer and VPN server computer. Select this setting when, for example, the VPN client computer and VPN server computer are both directly connected to a global IP address usable on the Internet or when a normal NAT or transparent firewall exists between the two computers.
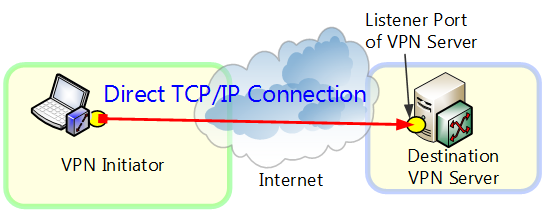
Direct TCP/IP Connection.
4.4.3 Connection Via HTTP Proxy Server
When a direct TCP/IP connection cannot be used, you can connect to VPN Server via an HTTP proxy server.
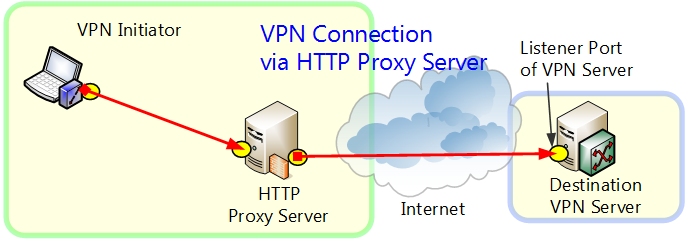
Connection Via HTTP Proxy Server.
To connect to VPN Server via an HTTP proxy server, select [Connect Via HTTP Proxy Server], and then click [Proxy Server Connection Setting] and enter the required information. For more information about the settings on the [Proxy Server Connection Setting] window, please contact the administrator of the HTTP server.

Proxy Server Connection Setting Window.
| You can connect through a standard proxy server that supports the CONNECT method. Depending on the proxy server, the connection via the CONNECT method may only be allowed through port 443. In this case, set port 443 of the destination SoftEther VPN Server as the listener port in advance, and then try connecting to that port. By default, port 443 is enabled on VPN Server, but separate software products may also use the same port, so caution must be exercised. For details, please contact the administrator of the destination VPN Server. |
4.4.4 Connection Via SOCKS Proxy Server
When a direct TCP/IP connection cannot be used, you can connect to VPN Server via a SOCKS proxy server if available.
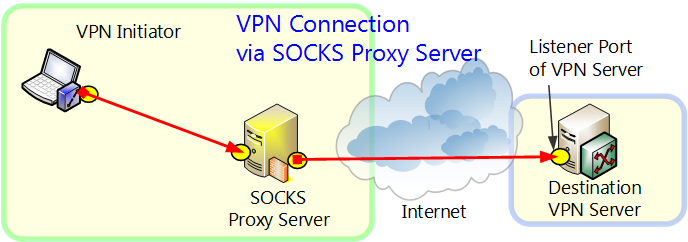
Connection Via SOCKS Proxy Server.
To connect to VPN Server via a SOCKS proxy server, select [Connect Via SOCKS Proxy Server], and then click [Proxy Server Connection Setting] and enter the required information. For more information about the settings on the [Proxy Server Connection Setting] window, please contact the administrator of the SOCKS server.
| At the time of writing this manual, SoftEther VPN Client supports SOCKS protocol version 4, but does not support version 5. |
4.4.5 Server-Certificate Verification
Enabling Server-Certificate Verification
As described in 2.3 Server Authentication, verifying that the server certificate of the destination VPN Server is valid on the VPN client computer guarantees through mathematical calculations that the destination VPN Server is the correct computer and that there is no "man-in-the-middle attacker". For high security applications requiring verification of the server certificate, use the server-certificate verification option.
Checking the box next to [Always Verify Server Certificate] performs verification of the server SSL certificate when establishing a VPN connection using that connection setting. By default, this box is not checked, so check it if necessary.
Clicking [Manage Trusted CA Certificate List] opens a window with a list of certificates from trusted certification authorities managed by VPN Client (or the Virtual Hub in a cascade connection). You can use this window to add, delete, or confirm trusted certificates. When [Always Verify Server Certificate] is enabled and the user attempts to connect to the VPN, VPN Client (or the Virtual Hub) checks whether the certificate presented by the destination VPN Server is signed, according to the list of trusted certificates, and connects only to the VPN Server with a signed certificate.
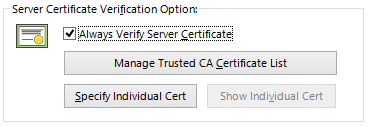
Server-Certificate Verification Options Window.
Clicking [Specify Individual Cert] associates, in advance, the unique server certificate of the VPN Server to which VPN Client is connecting with that connection setting. If the destination VPN Server already has a server certificate, you can use this function to register that certificate, thereby authenticating the server. This is an easy way to authenticate a small-scale destination VPN server.
Window Displayed When Certificate Verification is Enabled and the Destination VPN Server Presents an Untrusted Server Certificate When Connecting (Only for VPN Client)
The [Security warning] window is displayed if it is determined that the certificate presented by the destination VPN Server cannot be trusted when connecting to VPN Server with the [Always Verify Server Certificate] option enabled. This window displays detailed information of the certificate presented by VPN Server. You can review the displayed information to determine whether to trust the destination VPN Server. For example, you can ensure the security of the destination VPN Server by checking the validity of the digest value displayed to the VPN Server administrator over the telephone or by using another relatively safe method. Clicking [Cancel Connection] cancels the connection attempt to VPN Server.
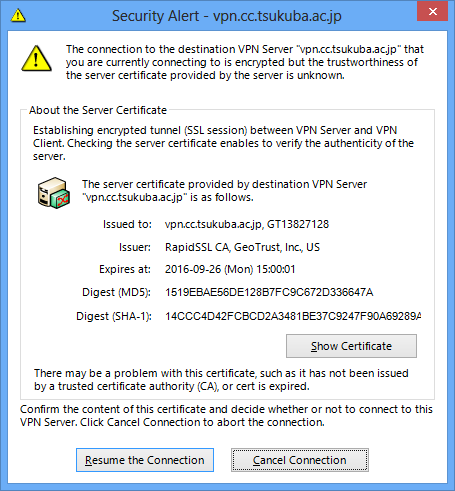
Security Warning Window Displayed for an Untrusted Server Certificate.
Clicking [Proceed with Connection] displays a dialog box asking the user whether to trust the certificate. Clicking [Yes] registers this certificate as a [individual certificate] for the connection setting, and the security alert is not displayed again if there are no changes to the certificate presented by VPN Server. Clicking [No] does not register the certificate.
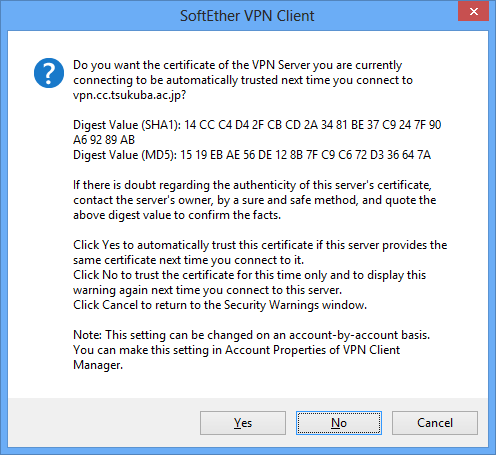
Dialog Box Asking Whether to Trust the Server Certificate.
If the certificate presented by VPN Server differs from the individual certificate registered to the connection setting, the dialog box below is displayed. In this case, we recommend that you immediately terminate the connection.
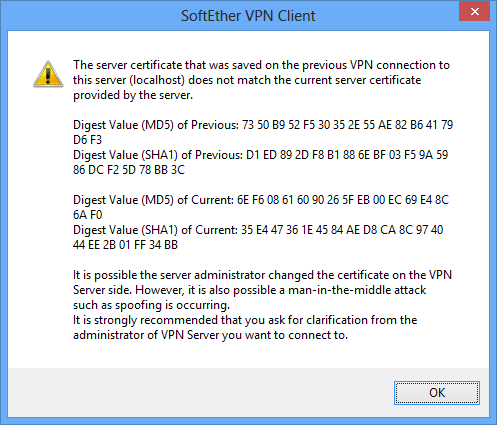
Security Warning Window Displayed When Server Certificates Do Not Match.
| The security warning windows described here are only displayed on SoftEther VPN Client. When using a cascade connection on SoftEther VPN Server or SoftEther VPN Bridge, a connection error is automatically generated and these windows are not displayed, so caution must be exercised. |
4.4.6 Selecting a Virtual Network Adapter
The VPN Client user must select the Virtual Network Adapter for the connection setting. As described in 4.3 Virtual Network Adapter, a Virtual Network Adapter must be registered to Windows in advance. When creating a connection setting, select the Virtual Network Adapter you want to use to connect to VPN Server with the connection setting, from the [Virtual Network Adapter to Use] list.
4.4.7 User Authentication Setting
Selecting the Type of User Authentication
You must enter the settings related to user authentication on the connection setting. Select one of the following user authentication methods for [Auth Type].
- Anonymous Authentication
- Standard Password Authentication
- RADIUS or NT Domain Authentication
- Client Certificate Authentication
- Smart Card Authentication
(Only for VPN Client. Cannot be used in a cascade connection.)
You must enter a user name in [User Name] regardless of the selected user authentication type. The other required information varies depending on the selected authentication type.
Information Required for Anonymous Authentication
Other than the user name, no information is required to use anonymous authentication. For more information about anonymous authentication, please refer to 2.2 User Authentication.
Information Required for Standard Password Authentication and RADIUS or NT Domain Authentication
Enter the password for user authentication when using standard password authentication or RADIUS or NT domain authentication.
| The password entered here is saved and written to the disk drive as connection information of VPN Client. If this operation is not desirable for security reasons, you can leave the password field blank. This prevents the password from being saved as part of the connection setting and displays the password entry window each time you connect to VPN Server. |
For more information about password authentication, please refer to 2.2 User Authentication.
Information Required for Client Certificate Authentication
When using client certificate authentication, you must specify the certificate to be presented to VPN Server as the client certificate. To specify a certificate, click [Specify Client Certificate].
For more information about certificate authentication, please refer to 2.2 User Authentication.
The client certificate and private key specified here are written to the disk drive as setting information of VPN Client. Normally, only users with administrative rights can read files with VPN Client setting information, and therefore, it is safe. However, if, for example, a notebook computer with VPN Client installed is stolen, the contents of the hard disk can be analyzed and the private key data can be stolen. To eliminate this risk, we recommend using smart card authentication.
Information Required for Smart Card Authentication
When using smart card authentication, you must specify the smart card with the certificate to be presented to VPN Server as the client certificate and the smart card object name. First, click [Select Smart Card] and select the smart card you want to use. Then click [Specify Cert and Private Key] and select the certificate object and private key object for authentication. For more information about smart cards, please refer to 4.6 Using and Managing Smart Cards.
4.4.8 Use of the Smart Card Authentication
VPN Client support user authentication with the Smart card. Smart card authentication is the safe authentication method, compare normal authentication certification mode. When VPN Client connect for VPN Server with Smart Card Authentication , judging from VPN Server side, seem to have connected VPN Client use a normal certificate certification mode. But VPN Client begins to read the certificate from an Smart card not a hard disk. And the private key is process the authentication of the PKI by an RSA operation tip in the Smart card without taking it out.
About an IC card, please refer to 4.6 Using and Managing Smart Cards.
4.4.9 Automatic Reconnection Function
You can configure the setting for automatic reconnection, as described in "Reconnection Setting When the VPN Connection Fails or is Dropped" in 2.1 VPN Communication Protocol. To use the automatic reconnection function, check the box next to [Reconnect When Lost Connection to VPN Server] and specify [Reconnection Count] and [Reconnection Interval]. Checking the box next to [Reconnection Endless (Keep VPN Session Always)] allows VPN Client to continually attempt to reconnect to VPN Server if the connection is dropped.
The automatic reconnection function cannot be used when using smart card authentication because the user would constantly be asked to enter the PIN code for user authentication in order to reconnect.
4.4.10 Connection Status and Error Message Displays
Checking the box next to [Don't display connection status and error window when connecting to VPN Server] prevents the display of dialog boxes with error messages and the connection status to VPN Server. When this is enabled, the following dialog box, for example, is not displayed and the connection process runs in the background.

Dialog Box Displaying the Connection Status of VPN Client.
4.4.11 Advanced Communication Settings
To make changes to the advanced communication setting options, as described in 2.1 VPN Communication Protocol, click [Advanced Settings]. These settings are for the system administrator and users with a strong understanding of network communication protocols and network security. General end users should only change settings specified by the VPN Server administrator or network administrator.
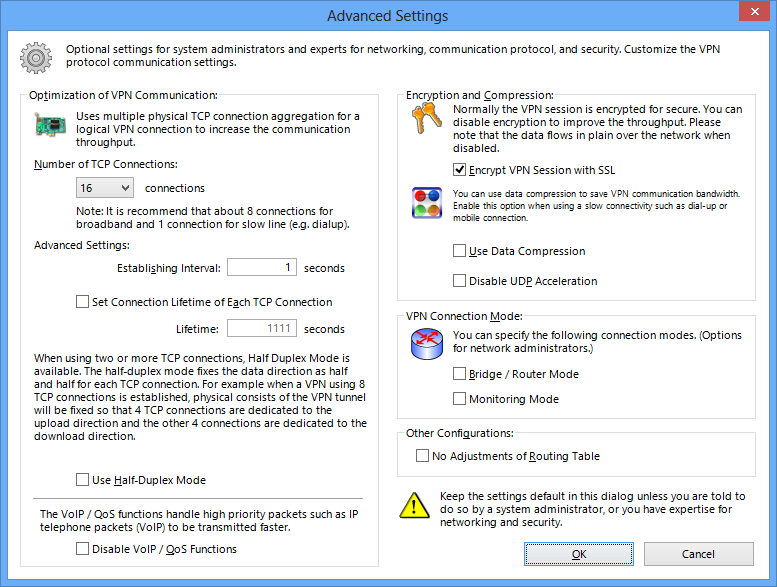
[Advanced Settings] Window.
4.4.12 Number of TCP/IP Connections for VPN Session Communications
You can adjust the [Number of TCP Connections] setting on the [Advanced Settings] window. This setting is described in "Number of TCP/IP Connections for VPN Communications" in 2.1 VPN Communication Protocol.
4.4.13 Interval Between TCP Connections and Length of TCP Connection
You can adjust the [Establishing TCP Connection Interval] and [Keep Alive] settings on the [Advanced Settings] window. These settings are described in "Interval Between TCP/IP Connections and Length of TCP/IP Connection" in 2.1 VPN Communication Protocol.
4.4.14 Half-Duplex Mode Option
You can enable or disable the [Use Half-Duplex Mode] option on the [Advanced Settings] window. This function is described in "Using Half-Duplex Mode" in 2.1 VPN Communication Protocol.
4.4.15 SSL Encryption Option
You can disable the [Encrypt VPN Session by SSL] option on the [Advanced Settings] window. This function is described in "Disabling the Encryption Option" in 2.1 VPN Communication Protocol. When VPN Client is connected to VPN Server running on a local host (same host as the client), SSL encryption is not required, so this option is automatically disabled.
4.4.16 Data Compression Option
You can enable or disable the [Use Data Compression] option on the [Advanced Settings] window. This function is described in "Using Data Compression" in 2.1 VPN Communication Protocol.
4.4.17 Selecting the Connection Mode
You can enable either of the following two connection modes in the [Connection Mode Settings] field of the [Advanced Settings] window.
- Bridge / Router Mode
- Monitoring Mode
Checking the box next to either of these connection modes enables that connection mode for the connection session with VPN Server. For information about these special connection modes, please refer to 1.6 VPN Communication Details.
4.4.18 Routing Table Rewrite Process
By default, the [Don't Modify Routing Table] option in the [Advanced Communication Settings] window is disabled.
Windows automatically rewrites the routing table to ensure proper VPN communication even when the Virtual Network Adapter side of VPN Client is set as the default gateway after connecting to VPN Server.
If, for a special reason, you do not want to rewrite the routing table, add a check to the box next to this option.
4.4.19 Startup Connection
You can set a connection setting for startup connection by using VPN Client Manager to select a connection setting and then clicking [Set as Startup Connection] on the [Connect] menu. When a connection setting is set for startup connection, a connection to VPN Server is automatically started using that connection setting when Windows is started.
If, for example, you want to maintain a constant connection to a specific Virtual Hub when the computer is running, set that connection setting to startup connection and enable the [Reconnection Endless (Keep VPN Session Always)] option. In this way, VPN Client automatically attempts to connect to VPN Server using the specified connection setting when Windows is started, even if a user is not logged on to Windows.
The icon of the connection setting registered as the startup connection changes as follows in VPN Client Manager.

Icon of the connection setting When Set to Startup Connection.
4.4.20 Exporting and Importing Connection Settings
Exporting and Importing
You can export a connection setting registered to VPN Client and save it as a file. An exported connection setting can also be copied by importing it to VPN Client running on the same or a separate computer.
To export a connection setting, select the connection setting and click [Export VPN Connection Setting] on the [Connect] menu. Next, specify the file name of the connection setting you want to save.
You can easily import an exported connection setting simply by double-clicking the connection setting file in Explorer or on the folder window. To import a connection setting using VPN Client Manager, click [Import VPN Connection Setting] on the [Connect] menu and specify the file name of the exported connection setting file.
Using the Export and Import Functions
The VPN Server or Virtual Hub administrator can use these functions to distribute a connection setting to users. The user can then double-click the connection setting file to easily add the connection setting data to VPN Client running on the user's computer. The imported connection setting can also be edited by the user.
Content of the Exported Connection Setting File
The connection setting is exported as a special text file with the extension .vpn. The content of the connection setting file is as follows.
# VPN Client VPN Connection Setting File
#
# This file is exported using the VPN Client Manager.
# The contents of this file can be edited using a text editor.
#
# When this file is imported to the Client Connection Manager
#  it can be used immediately.

declare root
{
 bool CheckServerCert false
 uint64 CreateDateTime 0
 uint64 LastConnectDateTime 0
 bool StartupAccount false
 uint64 UpdateDateTime 0

 declare ClientAuth
 {
  uint AuthType 1
  byte HashedPassword AAAAAAAAAAAAAAAAAAAAAAAAAAA=
  string Username $
 }
 declare ClientOption
 {
  string AccountName public.softether.com
  uint AdditionalConnectionInterval 1
  uint ConnectionDisconnectSpan 0
  string DeviceName VPN
  bool DisableQoS false
  bool HalfConnection false
  bool HideNicInfoWindow false
  bool HideStatusWindow false
  string Hostname public.softether.com
  string HubName PUBLIC
  uint MaxConnection 1
  bool NoRoutingTracking false
  bool NoTls1 false
  bool NoUdpAcceleration false
  uint NumRetry 4294967295
  uint Port 443
  uint PortUDP 0
  string ProxyName $
  byte ProxyPassword $
  uint ProxyPort 0
  uint ProxyType 0
  string ProxyUsername $
  bool RequireBridgeRoutingMode false
  bool RequireMonitorMode false
  uint RetryInterval 15
  bool UseCompress false
  bool UseEncrypt true
 }
}
As shown in the example above, all content of the connection setting file is written in text. Any hiragana, kanji, or other multibyte characters are UTF-8 encoded. Normally, this text file does not need to be edited, but you can manually edit this file or write a program to automatically create a connection setting file, as shown above.
4.4.21 Creating a Shortcut for a Connection Setting
You can create a shortcut file for a connection setting registered to VPN Client. This shortcut file is the same type of shortcut file that can be created for files or folders in Windows.
To create a shortcut file for a connection setting, select a connection setting, click [Create VPN Connection Shortcut] on the [Connect] menu, and then specify the name of the shortcut file to be created. Once a shortcut file is created, it can be placed anywhere on the computer where a normal file can be set in Windows. For example, you can place the shortcut file on the desktop or add it to the Quick Launch bar.
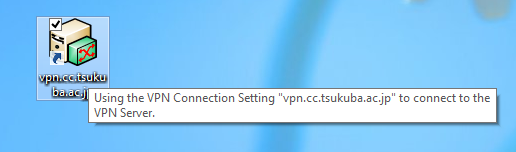
Connection Setting Shortcut File.
When the shortcut file for a connection setting is double-clicked while that connection setting is offline, the VPN connection for that connection setting is automatically started. When the shortcut file for a connection setting is double-clicked while VPN Client is connecting or is connected to the VPN, a dialog box is displayed asking whether to terminate the connection for that connection setting. Clicking [Yes] terminates the connection.
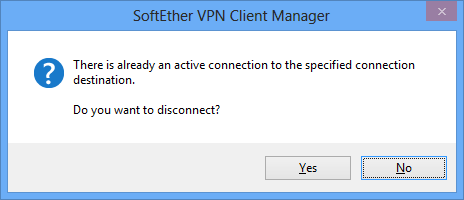
Dialog Box Displayed When Starting a Shortcut for a Connection Setting That is Already Connected.
4.4.22 VPN Server and VPN Bridge Cascade Connection Setting
You can use the same user interface as that used to create and edit a connection setting with VPN Client Manager to edit the settings to cascade-connect a Virtual Hub of VPN Server or VPN Bridge to a separate Virtual Hub with VPN Server Manager, as described in 3.4 Virtual Hub Functions.
You do not have to enter the following items when configuring the cascade connection settings.
- Virtual network adapter to use
- Interval between attempts to reconnect and reconnect retries
(Attempt to reconnect an infinite number of times at 10-second intervals) - Connection mode setting
(Always connect with bridge/router mode) - Rewrite routing table settings
(Do not rewrite routing table in a cascade connection)
See Also
- 2.1 VPN Communication Protocol
- 2.2 User Authentication
- 2.3 Server Authentication
- 3.4 Virtual Hub Functions
- 4.3 Virtual Network Adapter
- 4.6 Using and Managing Smart Cards
- 6.5.21 "AccountCreate": Create New VPN Connection Setting
- 6.5.22 "AccountSet": Set the VPN Connection Setting Connection Destination
- 6.5.23 "AccountGet": Get Setting of VPN Connection Setting
- 6.5.24 "AccountDelete": Delete VPN Connection Setting
- 6.5.25 "AccountUsernameSet": Set User Name of User to Use Connection of VPN Connection Setting
- 6.5.26 "AccountAnonymousSet": Set User Authentication Type of VPN Connection Setting to Anonymous Authentication
- 6.5.27 "AccountPasswordSet": Set User Authentication Type of VPN Connection Setting to Password Authentication
- 6.5.28 "AccountCertSet": Set User Authentication Type of VPN Connection Setting to Client Certificate Authentication
- 6.5.29 "AccountCertGet": Get Client Certificate to Use for Cascade Connection
- 6.5.30 "AccountEncryptDisable": Disable Encryption when Communicating by VPN Connection Setting
- 6.5.31 "AccountEncryptEnable": Enable Encryption when Communicating by VPN Connection Setting
- 6.5.32 "AccountCompressEnable": Enable Data Compression when Communicating by VPN Connection Setting
- 6.5.33 "AccountCompressDisable": Disable Data Compression when Communicating by VPN Connection Setting
- 6.5.34 "AccountProxyNone": Specify Direct TCP/IP Connection as the Connection Method of VPN Connection Setting
- 6.5.35 "AccountProxyHttp": Set Connection Method of VPN Connection Setting to be via an HTTP Proxy Server
- 6.5.36 "AccountProxySocks": Set Connection Method of VPN Connection Setting to be via an SOCKS Proxy Server
- 6.5.37 "AccountServerCertEnable": Enable VPN Connection Setting Server Certificate Verification Option
- 6.5.38 "AccountServerCertDisable": Disable VPN Connection Setting Server Certificate Verification Option
- 6.5.39 "AccountServerCertSet": Set Server Individual Certificate for VPN Connection Setting
- 6.5.40 "AccountServerCertDelete": Delete Server Individual Certificate for VPN Connection Setting
- 6.5.41 "AccountServerCertGet": Get Server Individual Certificate for VPN Connection Setting
- 6.5.42 "AccountDetailSet": Set Advanced Settings for VPN Connection Setting
- 6.5.43 "AccountRename": Change VPN Connection Setting Name
- 6.5.51 "AccountRetrySet": Set Interval between Connection Retries for Connection Failures or Disconnections of VPN Connection Setting
- 6.5.52 "AccountStartupSet": Set VPN Connection Setting as Startup Connection
- 6.5.53 "AccountStartupRemove": Remove Startup Connection of VPN Connection Setting
- 6.5.54 "AccountExport": Export VPN Connection Setting
- 6.5.55 "AccountImport": Import VPN Connection Setting