Table of contents
This section will explain how to set up a PC-to-PC VPN.
10.3.1 Configuring VPN Server
You need one properly configured VPN Server machine to build a PC-to-PC VPN. A PC-to-PC VPN is the simplest type of VPN and allows client computers equipped with VPN Client to communicate with each other over the VPN. While there are no notably difficult tasks in building this type of network, you should be aware of the following things.
Using Static IP Addresses
You will configure the VPN Client's Virtual Network Adapter to connect to the Virtual Hub just as you would a normal physical network adapter. The easiest connection method is to manually assign static private IP addresses to each of the connected VPN Client's so that they do not overlap.
For example, if 10 machines will be connecting to the Virtual Hub you can assign each of them an IP address in the range of 192.168.1.1 to 192.168.1.10 so that they will be able to communicate with each other.
About APIPA (Automatic Private IP Addressing)
All Windows versions since Windows 98 and the latest Mac OS come packaged with APIPA (Automatic Private IP Addressing) capabilities. APIPA automatically assigns an IP address at random from the IP range 169.254.0.1 to 169.254.255.254 to a network adapter if it does not receive an IP from DHCP in a certain amount of time (around 1 minute). This assignment occurs even if the network adapter is configured to receive an IP via DHCP.
The APIPA functionality built in to Windows or Mac OS will assign IP addresses to Virtual Network Adapters on the Virtual LAN even if no DHCP server exists on the network. Computers that have been temporarily automatically assigned IP addresses via APIPA will be able to communicate with each other. However, there are stability issues when using APIPA assigned IP addresses. Therefore, we recommend that you either manually assign static IP addresses or use the following method to establish a DHCP server to officially assign IP addresses to the computers on your VPN.
Using a DHCP Server to Dynamically Assign IP Addresses
You can configure VPN Server to automatically assign IP addresses to VPN Clients when they connect to a Virtual Hub. The Virtual Hub is the same as an ordinary LAN in that it is an independent Ethernet segment. Therefore, if there is a DHCP server in that Ethernet segment it can be configured to automatically assign IP addresses to the connecting client's Virtual Network Adapter.
If you already have a DHCP server software package (such as the DHCP server service included with Windows 2000 Server/Windows Server 2003 or some other commercial/freeware DHCP server) you can use the following method. Enable the DHCP server and install VPN Client and a Virtual Network Adapter to that computer. By then connecting that machine to the Virtual Hub all computers on that Virtual Hub will automatically be assigned IP addresses via your DHCP server software.
If you can't use your DHCP server software for this purpose or you want a simpler DHCP server solution you can use the Virtual DHCP Server capability included with VPN Server. The Virtual DHCP Server will automatically assign IP addresses via DHCP to computers connected to a Virtual Layer 2 Segment created by a Virtual Hub. To do this, enable SecureNAT on the Virtual Hub and under the SecureNAT configuration use only Virtual DHCP Server. Do not use Virtual NAT. Please refer to section 3.7 Virtual NAT & Virtual DHCP Servers for more detailed information about configuring SecureNAT.
10.3.2 Network Layout
This section will explain the following type of network layout as an example.
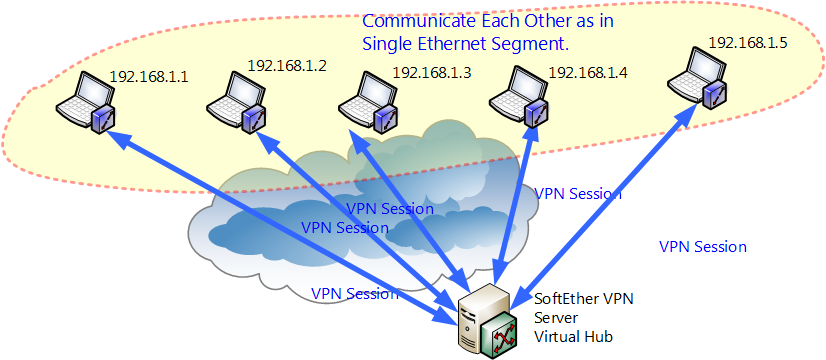
Network Layout.
In the example network above the VPN Server has a public IP address with 1 Virtual Hub. The 5 clients are remotely connected to the Virtual Hub and can freely, safely, and securely communicate with each other. Each VPN Client's Virtual Network Adapter has been assigned a static IP address of 192.168.1.1, 192.168.1.2, 192.168.1.3, 192.168.1.4, and 192.168.1.5 respectively.
10.3.3 Connecting to the VPN Remotely/Performing a Communication Test
Using the ping Command to Perform a Communication Test
So you've installed a Virtual Hub to your VPN Server, configured your user authentication method, and installed VPN Client to each client computer. Now you should try to connect to the Virtual Hub from each of those client computers.
Once all of the clients are connected to the Virtual Hub you should use the ping command to ping another computer at its IP address on the Virtual Network to test if the VPN is properly working.
C:\>ping 192.168.1.3 Pinging 192.168.1.3 with 32 bytes of data: Reply from 192.168.1.3: bytes=32 time=2ms TTL=128 Reply from 192.168.1.3: bytes=32 time=2ms TTL=128 Reply from 192.168.1.3: bytes=32 time=1ms TTL=128 Reply from 192.168.1.3: bytes=32 time=2ms TTL=128 Ping statistics for 192.168.1.3: Packets: Sent = 4, Received = 4, Lost = 0 (0% loss), Approximate round trip times in milliseconds: Minimum = 1ms, Maximum = 2ms, Average = 1ms C:\> |
However, note that if the client computer has a personal firewall or other such software installed then the ICMP packets will not be handled properly and the ping command will not be a feasible method to check IP communication across the Virtual Network.
Windows File Sharing Test
You can use Windows File Sharing within the VPN to safely share files across the network.
To test if Windows File Sharing is working properly create a shared folder and try to access that folder on another computer through the VPN.
If the Windows machines are in the same layer 2 segment name resolving will be handled by a NetBIOS over TCP/IP broadcast. (DNS or WINS is not required.) Therefore, to test if the VPN is working properly you can attempt to open a shared folder by inputting the command \\COMPUTER_NAME in the Windows [Run] dialog. If name resolving is not functioning properly you can also open a shared computer by entering the command \\IP_ADDRESS instead of using the computer's name.
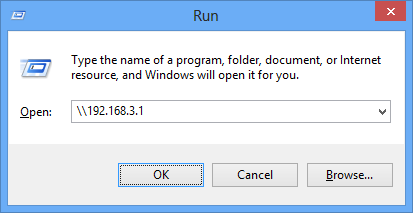
Specifying a Computer in the [Run] Dialog.

Shared Folder Accessed Via the VPN.
However, note that if the client computer has a personal firewall or other such software installed then the Windows File Sharing protocol (SMB, ICFS, etc.) will not be handled properly and this will not be a feasible method to check IP communication across the Virtual Network. In this case you should disable your personal firewall to the VPN network.