Table of contents
- 1. 3.3.1 Administration without the need for System Stop
- 2. 3.3.2 SoftEther VPN Server and Virtual Hubs
- 3. 3.3.3 Administration Tools & Remote Administration
- 4. 3.3.4 Administration Authority
- 5. 3.3.5 SSL Certificates
- 6. 3.3.6 Listener Ports
- 7. 3.3.7 Configuration File
- 7.1. Role of the Configuration File
- 7.2. Protecting the Configuration File
- 7.3. Configuration File Format
- 7.4. Example of a Configuration File
- 7.5. Data Structure of the Configuration File
- 7.6. Replacing the Configuration File
- 7.7. Transferring the Configuration File to Another Computer
- 7.8. Remotely Reading & Rewriting Configuration File Contents
- 8. 3.3.8 Configuration Version Numbers
- 9. 3.3.9 Configuration History
- 10. 3.3.10 Administration of Statistical Information
- 11. 3.3.11 Automatic Adjustment when Disk Space is Insufficient
- 12. 3.3.12 Failure Recovery
- 13. 3.3.13 Keep Alive Internet Connection Function
- 14. 3.3.14 Obtaining Server Information
- 14.1. Obtaining Server Status
- 14.2. VPN Server Information
- 15. 3.3.15 Selecting Encryption Algorithms for use in SSL Transmission
- 16. 3.3.16 Initializing the VPN Server Service Reboot & Configuration Information
- 17. 3.3.17 Syslog Transmission Function
- 18. 3.3.18 Restricting by IP Address of Remote Administration Connection Source IPs
- 18.1. Ensuring Security by Limiting Administration Connection Sources
- 18.2. How to Write adminip.txt Files
- 18.3. Designating Source IP Addresses for each Virtual Hub in Virtual Hub Administration Mode
- 18.4. Designating Source IP Addresses in Entire Virtual Hub Administration Mode
- 18.5. adminip.txt File Permission
- 19. See Also
Operations to administer the SoftEther VPN Server are divided into two main types. One is for the overall administration of the VPN Server while the other is for the administration of specific Virtual Hubs within the VPN Server. Here we will first explain the know-how and handling methods required to administer the entire VPN Server.
The following explanation contains a description of specific methods for handling the SoftEther VPN Server Manager and the corresponding VPN command line management utility (vpncmd) command names. Please refer to 6. Command Line Management Utility Manual for details on how to use each of the vpncmd commands.
3.3.1 Administration without the need for System Stop
The entire program structure of the SoftEther VPN Server has been carefully designed, so that the VPN Server process itself does not have to be rebooted regardless of the type of settings changes being made. The only exceptions whereby the VPN Server process must be rebooted are the following four cases.
- When rebooting the operating system.
- When updating the VPN Server program.
- When the VPN Server process goes out of control due to a hardware or other type of malfunction and needs to be rebooted.
- When manually configuring the VPN Server configuration file or rolling back to old versions.
While the VPN Server process does not have to be rebooted for the following settings changes, the VPN session connected when the internal status of the VPN Server's server module is being initialized is temporarily disconnected and then later reconnected.
- When changing the server clustering settings.
3.3.2 SoftEther VPN Server and Virtual Hubs
Multiple Virtual Hubs can be created in the SoftEther VPN Server. Each Virtual Hub has an independent layer 2 segment and is incapable of communicating with the others. Furthermore, the user verification-oriented user authentication database and access list, trusted certificate list, RADIUS server settings, SecureNAT settings and cascade connection settings are managed by the Virtual Hub units and are completely independent of each other. Changes to the settings of a Virtual Hub do not have any effect upon the operation of any other Virtual Hubs.
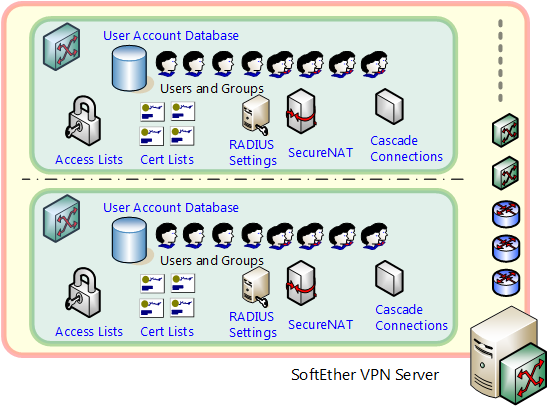
The VPN Server, Virtual Hubs & settings data which can be held by each hub.
3.3.3 Administration Tools & Remote Administration
Administration of the SoftEther VPN Server is carried out using the SoftEther VPN Server Manager described in 2.4 VPN Server Manager and the VPN command line management utility (vpncmd) described in 2.6 VPN Command Line Management Utility (vpncmd). Connection to the VPN Server for administration sessions is possible from a local or remote computer, and if the VPN Server is connected to the Internet, then administration connection and remote administration of the VPN Server is theoretically possible from anywhere in the world.
The SoftEther VPN Server Manager is suitable for GUI administration, while the VPN command line management utility (vpncmd) is suitable for CUI administration. Apart from these two utilities, no other utilities are required for the day-to-day administration of the VPN Server. We recommend permanently installing these two utilities on administration terminals. Please refer to 2.4 VPN Server Manager for details on the installation of administration tools.
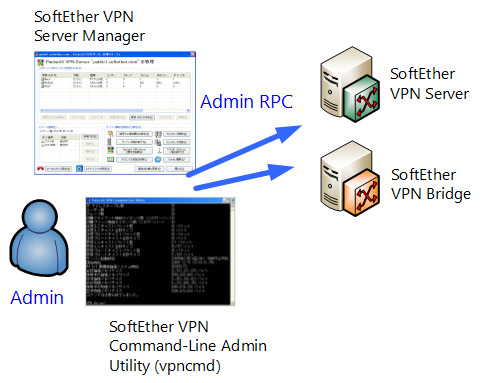
Methods for administering the VPN Server & VPN Bridge.
3.3.4 Administration Authority
There are two types of administration authority in order to connect to and administer the VPN Server in Administration Mode.
Administration Authority for the Entire SoftEther VPN Server
Administration authority for the entire SoftEther VPN Server should be held by the persons responsible for administering the server computer. This authority makes it possible to change the settings of all VPN Server items, create new Virtual Hubs, administer existing Virtual Hubs and delete all existing Virtual Hubs and the objects contained therein. As such, administration authority for the entire SoftEther VPN Server is very important and should be treated carefully as tantamount to root authority / Administrators authority in a common computer. When installing the VPN Server on a server computer, it is best for the Administrator with the administration authority for that server computer's operating system to hold the administration authority for the entire VPN Server.
The administration authority for the entire VPN Server is protected by a password. This password is initially blank so we recommend changing it immediately after installing the VPN Server (Footnote: the current installer does not display a window to set the password during installation). Connecting to the VPN Server using the VPN Server Manager when no Administrator password has been set displays a message box prompting the setting of a password, so please click [Yes] and set the password immediately. A password set on the VPN Server possesses the same degree of safety as an Administrator password on a Windows or UNIX server. Please rest assured that a VPN Server Administrator password is hashed and then saved then will no longer be restored as clear text.
To change the overall VPN Server password, click on [Encryption and communication settings] in the VPN Server Manager, then click on [Administrator password] and enter the new password twice in the text box which appears. In the vpncmd utility, the password can be set using the command [ServerPasswordSet].
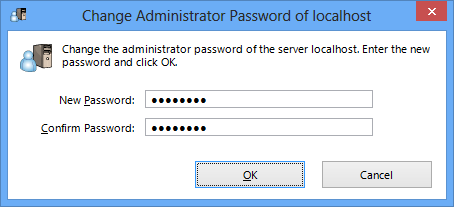
Changing the VPN Server password.
Virtual Hub Administration Authority
Administrators of the entire SoftEther VPN Server can create multiple Virtual Hubs on the VPN Server. Also, when creating a new Virtual Hub, a password to administer that hub can be set and passed to the persons responsible for its administration, thereby enabling the delegation of authority for each hub's administration. In the event that no administration password is designated upon the creation of a hub, there is no risk that said hub can be remotely accessed by Virtual Hub Administration Mode. For details on Virtual Hubs, please refer to 3.4 Virtual Hub Functions and 3.5 Virtual Hub Security Features.
3.3.5 SSL Certificates
A X.509 certificate can be set as the server certificate (SSL certificate) on the SoftEther VPN Server. This enables VPN client computers attempting to connect to the VPN Server to carry out server authentication using the server certificate.
When designating an SSL certificate, the X.509 format file and RSA private key data of the certificate to be set are required. These files may be bundled together as one file in the PKCS#12 format. Where no particular SSL certificate is designated, the VPN Server will automatically generate a random certificate (Self Signed Certificate) using random numbers upon the initial launch of the VPN Server, there is no problem with using this default certificate as it is when there is only a small group environment and the digest value and so on can safely be notified to the VPN Client's users.
To designate the X.509 certificate and private key to be presented to the client by the VPN Server, click on [Encryption & communication settings] in the VPN Server Manager, then click [Import certificate]. The same task can be performed in the vpncmd utility using the command [ServerCertSet]. Once the SSL Server Certificate has been set, the Administrator of the entire VPN Server can export the certificate data and private key data.
To check whether the certificate is being used properly once set, access https:// server ip address : listener port number/ from the web browser and confirm whether the certificate is properly recognized by said browser.

X.509 certificate displayed on VPN Server upon connection via web browser.
3.3.6 Listener Ports
The SoftEther VPN Server enables multiple TCP/IP ports to be set on standby and VPN client computers can then establish a VPN connection and VPN session with those ports via an Internet or other IP network. That is why it is essential for the VPN Server Administrator to register the listener ports in advance.
Initially, the three TCP/IP port numbers 443, 992 and 5555 are allocated to the VPN Server as listener ports. While as many listener ports as system resources allow can be added, typically one or two ports are sufficient.
We recommend using TCP/IP port 5555 to connect to the VPN Server where no hindrances exist, and port no. 443 where there is a firewall or proxy server which only allows web or other partial protocol to pass. Port no. 443 is a port for https protocol, so performing SSL transmission on this port usually enables passage even on networks with stringent security settings. Meanwhile, 992 is a port number for the TELNET over SSL (Telnets) protocol, which is practically unused today, and can pass through most firewalls (although it often fails to pass through proxy servers). It is also possible to register several listener ports and then disable some of them (suspend status).
To add, delete, enable or disable listener ports, click on [Create], [Delete], [Start] or [stop] at [Management of Listeners] in the VPN Server Manage. In the vpncmd utility, the same tasks can be carried out using the [ListenerCreate], [ListenerDelete], [ListenerList], [ListenerEnable] or [ListenerDisable] commands.
When launching the VPN Server, all registered listener ports which are not disabled are opened and put on standby. In addition, registering new listener ports also sees those ports automatically put on standby. If a port cannot be put on standby, an [Error] message will be displayed until the other process exclusively using that port is terminated or until the port is released, and the VPN Server automatically secures the port once either of these happens.
For UNIX operating systems excluding Windows, no TCP/IP port numbers below 1024 can be opened while the server is running on general user authority. This is a restriction imposed by the operating system and not the SoftEther VPN.
| Stopping or removing all of the available listener ports makes it impossible to connect to that VPN Server again after that administration session has finished. Please therefore avoid such actions as the Configuration file must be manually edited in order to restore this status. |
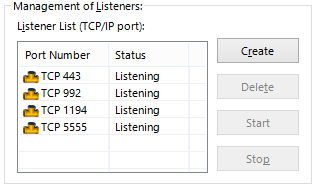
Management of Listeners window.
3.3.7 Configuration File
The SoftEther VPN Server retains all settings details within its memory and also simultaneously saves them to disk settings files. This settings file is called either the Config file or Configuration file.
The Configuration file is very similar to the Windows Registry files and UNIX's settings files. The file has an excellent configuration data format with dual features, namely a tree-like data structure similar to that of the Windows Registry files and a structure which can be edited directly with a text editor like that of the UNIX settings files.
Role of the Configuration File
The Configuration file is created under the file name "vpn_server.config" which is located in the same directory as that containing the VPN Server processes' executable files. The Configuration file is invariably saved whenever the VPN Server settings are changed or its internal structural data is modified (please note that the file may not be saved immediately due to the disk cache running to reduce the number of disk accesses). The VPN Server stops, and when booted the next time, reads the contents of the vpn_server.config file and, based upon said contents, returns to its values prior to termination. The Configuration file therefore allows the VPN Server's structural data to be restored upon launch to how it was prior to shutdown, regardless of when said shutdown occurs. If the Configuration file does not exist on the disk when the VPN Server is launched, the default settings are applied. The default settings are as follows.
- A Virtual Hub named "DEFAULT" is created. User objects, group objects or any other objects do not exist within the Virtual Hub and all of the settings are default ones (i.e. newly created Virtual Hub settings).
- Three listener ports, numbers 443, 992 and 5555, are registered.
- Local bridge and virtual layer 3 switch definitions are not registered.
- A server certificate is automatically generated using random numbers.
- The Internet connection keep-alive function's default values are set.
The Configuration file for the SoftEther VPN Bridge is named "vpn_bridge.config" and the Virtual Hub created by default is named "BRIDGE".
Protecting the Configuration File
All of the structural data used by the VPN Server and Virtual Hub are written inside the Configuration file. Contained within is the encrypted password and connection setting certificate's private key in order to cascade to another VPN Server.
As such, it is necessary to protect the Configuration file with suitable security functions where multiple users are able to log in either locally or remotely. The Configuration file should not be able to viewed (read) let alone modified by any users other than the VPN Server's System Administrator.
- The Windows version SoftEther VPN Server automatically sets the Configuration file upon installation so that read/write can only be done by the Administrators group users and SYSTEM (local system authority).
- The UNIX version SoftEther VPN Servers including the Linux version set permission at 700 (read/write for owner only) when creating the Configuration file.
- Use the operating system's file system function to manually change the file permissions. For Windows, Explorer's properties and the "cacls" command can be used. For UNIX, the "chmod" command is available.
- It is necessary to avoid the use of file system's which do not feature the FAT or FAT32 permission concepts. If the use of such file systems is inevitable, the file permissions should be placed where physical contact with the server computer is not possible. It is also necessary to implement settings to prevent them from being accessed by anyone other than the Administrators even over a network.
Configuration File Format
The Configuration file (vpn_server.config) is stored in the UTF-8 format so its contents can be edited with a common text editor. Note however, that directly editing the contents of the Configuration file is not recommended (changes to the VPN Server settings should be performed by the VPN Server Manager or by the vpncmd commands).
The Configuration file must only be directly edited in the following situations.
- When all of the TCP/IP listener ports have been deleted.
- When resetting passwords due to all of the VPN Server Administrator passwords being forgotten/ lost.
- When directly editing the Configuration file to perform very minor special settings.
- When wishing to automatically process the Configuration file using separate software for administrative reasons.
The Configuration file is stored in text format in default but the settings data volume grows very large when carrying out processing such as the registration of a large number of Virtual Hubs and users. String processing is required to write large volumes of settings data, and this consumes CPU time so performance declines as the settings data grows larger.
In this case, the format for writing the Configuration file can be changed to a binary file format. Binary file formats are those which can be handled directly by the CPU so they can be quickly processed. If the size of the Configuration file exceeds several tens of megabytes, then handling it as a binary file is more efficient. Binary file formatting does however, make it difficult to directly edit the Configuration file in a text editor.
To save the Configuration file in binary format, create an empty file named "save_binary" in the same directory as the Configuration file. Once this file exists, the Configuration file will automatically be saved in binary format the next time that the VPN Server writes in it. In addition, when the [save_binary] file has been deleted, the Configuration file will automatically be returned to text format the next time that the VPN Server writes in it.
| Please do not rewrite a binary format Configuration file using a binary editor or the like. |
Example of a Configuration File
Below is an actual example of a VPN Server Configuration file. The tree-like data is administered in this manner in text format in order from the top of the tree-like structure called "root".
# Software Configuration File
#
# You can edit this file when the program is not working.
#
declare root
{
 uint ConfigRevision 1
 bool IPsecMessageDisplayed false
 bool VgsMessageDisplayed false

 declare DDnsClient
 {
  bool Disabled false
  byte Key ki/0ARfOguxYuFAwum5NkqtTNiI=
  string LocalHostname PC26
  string ProxyHostName $
  uint ProxyPort 0
  uint ProxyType 0
  string ProxyUsername $
 }
 declare IPsec
 {
  bool EtherIP_IPsec false
  string IPsec_Secret vpn
  string L2TP_DefaultHub DEFAULT
  bool L2TP_IPsec false
  bool L2TP_Raw false

  declare EtherIP_IDSettingsList
  {
  }
 }
 declare ListenerList
 {
  declare Listener0
  {
   bool DisableDos false
   bool Enabled true
   uint Port 443
  }
  declare Listener1
  {
   bool DisableDos false
   bool Enabled true
   uint Port 992
  }
  declare Listener2
  {
   bool DisableDos false
   bool Enabled true
   uint Port 1194
  }
  declare Listener3
  {
   bool DisableDos false
   bool Enabled true
   uint Port 8888
  }
 }
 declare LocalBridgeList
 {
  bool EnableSoftEtherKernelModeDriver true
  bool ShowAllInterfaces false
 }
 declare ServerConfiguration
 {
  uint64 AutoDeleteCheckDiskFreeSpaceMin 8589934592
  uint AutoSaveConfigSpan 300
  bool BackupConfigOnlyWhenModified true
  string CipherName RC4-MD5
  uint CurrentBuild 8996
  bool DisableDeadLockCheck false
  bool DisableDosProction false
  bool DisableIntelAesAcceleration false
  bool DisableIPv6Listener false
  bool DisableNatTraversal false
  bool DisableOpenVPNServer false
  bool DisableSSTPServer false
  bool DontBackupConfig false
  bool EnableVpnAzure false
  bool EnableVpnOverDns false
  bool EnableVpnOverIcmp false
  byte HashedPassword +WzqGYrR3VYXrAhKPZLGEHcIwO8=
  string KeepConnectHost keepalive.se2.softether.com
  uint KeepConnectInterval 50
  uint KeepConnectPort 80
  uint KeepConnectProtocol 1
  uint MaxConnectionsPerIP 256
  uint MaxUnestablishedConnections 1000
  bool NoDebugDump false
  bool NoHighPriorityProcess false
  bool NoSendSignature false
  string OpenVPN_UdpPortList 1194
  bool SaveDebugLog false
  byte ServerCert MIIC6DCCAdACAQAwDQYJKoZIhvcNAQEFBQAwOjENMAsGA1UEAxMEUEMyNjENMAsGA1UEChMEUEMyNjENMAsGA1UECxMEUEMyNjELMAkGA1UEBhMCVVMwHhcNMTMwMzAyMDcxMjMzWhcNMzYxMjMxMDcxMjMzWjA6MQ0wCwYDVQQDEwRQQzI2MQ0wCwYDVQQKEwRQQzI2MQ0wCwYDVQQLEwRQQzI2MQswCQYDVQQGEwJVUzCCASIwDQYJKoZIhvcNAQEBBQADggEPADCCAQoCggEBAKozS1U1Yr3f1wceckua4LLHBLjDuSYQZ3wjfjixzolURxPP8F2L0T7j4F2QOwu+ZFCwT04FpcW8JVx6K3oij+IeYMYWA5mX7MHZHjnMLAQ8oCNV4O5Kju3T2HBGKpGugooYu9GRwPrWx0KiM+SsD3Ifv3KwWPGCwYx9t7Jed4x4Z41cDZH78mdxFFmoyvG4rj78N8L0KofhRhRA0FppBl01tvBsz3faZSbcVE5k0SKvN+CgPgJ4talPzyiHlrP/NKZ7xqJYH7oWbiYtgWX+oFCJ64JKjIgfm11ExYr6NSORzQBfA2YGF+a3NoWWIO3XLH0/6CaYFTlASlvW+UP1BokCAwEAATANBgkqhkiG9w0BAQUFAAOCAQEAKky/5DgXQa3FRTuwO762EVBIX+HJUaRLtJV0sUGnqNFQDjq37fa5CkV2tk0Vw5FrHvnPzVQrWISf0QEcNuDIvunI7PcCpFRixOq0fv4d4vXVs8Qm5iGYyD7U2ZycN/Jb/XYo5kbaOan+0q8ngekjuWtNigUYGetrds+xiFRQhfOUwTgPTVMW3akd+8ynv5rE/259j5zWTosmz09oiRlXFMwUJt/vNyAt6htlclfoDb/jP05uZFzCjMHjcf36XhfgnR41qoN4tmgkfEB2kibW0AGnydOkXnp73yB7ueZKPM3YHNJXfdCkids9xZc6p3AfxQVR6bfQ/OOviniFgH8PYQ==
  byte ServerKey MIIEpQIBAAKCAQEAqjNLVTVivd/XBx5yS5rgsscEuMO5JhBnfCN+OLHOiVRHE8/wXYvRPuPgXZA7C75kULBPTgWlxbwlXHoreiKP4h5gxhYDmZfswdkeOcwsBDygI1Xg7kqO7dPYcEYqka6Cihi70ZHA+tbHQqIz5KwPch+/crBY8YLBjH23sl53jHhnjVwNkfvyZ3EUWajK8biuPvw3wvQqh+FGFEDQWmkGXTW28GzPd9plJtxUTmTRIq834KA+Ani1qU/PKIeWs/80pnvGolgfuhZuJi2BZf6gUInrgkqMiB+bXUTFivo1I5HNAF8DZgYX5rc2hZYg7dcsfT/oJpgVOUBKW9b5Q/UGiQIDAQABAoIBAQCe+IwriVKyIMn6N0DwRzgLJALQBNgBqp7N/2Tc1Y8hDBvbcISFC5wkzrl5Csdr36hZCWT5biL5PxPyfZXwXSnhPRiMzHEOXC3incYym/ac+ndkqckPKYq4rv9hVthZ/BKnpBSB2U7TvBqfrVslAmTm5qpuGDLrWYMokyAqNTwacbHkJ6O7yA5shKH3IUOjWYQaF93JTr4q+KHOFPUaS4+pzAy6ubV1Shy4FbLyZ9+4g/sdPlRuDuGWM5HpG/rypvgB0/d6jPrLMR9qxeihdVsshAbgq9RAqYjOpqQSeH504eZJIg2TGsTbcVU/RdvJhXS4uXbBdJQvCYe/Yk1HhWpFAoGBANPfXtgW/8FC+hUfOILFoYm7rT5yGjhNW6fSsbQSIaGKU2vca19NqVxhzqdTPNsmAWCn7oDQBmUvycPXkamfiRytiyirho3nmkc5de1vvek9gLP9mfO9k+3LveURT6fKOOz/3J6adn5V7wEzTFvmYTy0BMiG1tsHEOI3iUmDka0XAoGBAM2mC4dpGEuBDXFGj8Uislwso26pQUNxPdqeKAMa3MvHFDvirPrAeTv7rsQ+6l/eRrx/LYf3JrLvGEelB7EFpgnzXG9ZG+nnv0j4w7EfTwcjKmRX8UCxXJ5smvGeBwGsTVtUDdoT7DV3NjhfMZjEqKCJ0RRpgMHepxqm1eU1RW1fAoGAMei2YNTaHl52pq8aEsQXT2ikYMdkIcsnQhtBvRdgULtS91+O835J3Pc1RPk4pq8HOAuXBUT7nK5rKvUG3Rw1oknHNCdjpN3f29NPUkU2SVExljSxJVeNF0EdVG6FgxMB4eJLyBi+vPflOzUoUaWtVi1ZyxroVeQOOBu4/VY+5LUCgYEAldWzdLfH8ctXhf8JZXMATVRgx5IecQsjLBQrxwdddEPapD9mFVUDgAbCsU296pfDJjfrbrNOyPSX1iuRzRL2hS2BXcepJOWrY3mM65KKPAMNMgs5Rg90EiHDSuP+6uMlgbNeXFRDuDjhknUZZ9txmXaQlbTBEYAudKa2FciYizUCgYEAsk5gyOSatourftMSP62MVQ7amyHDTVtvNuCbZX78OH3ejmzRw1pl6eDqCGo68i4Swu41RFr+K0c1sF119rwD+Z8rNjOhnFkYJ43WC4NspfCdKa9ZTXFkJxdeBQFD89HNFbDabqQE1ay1qIWB44wt95aNbHzXl0eBGgN7/o/8ehg=
  uint ServerType 0
  bool UseKeepConnect true
  bool UseWebTimePage false
  bool UseWebUI false

  declare ServerTraffic
  {
   declare RecvTraffic
   {
    uint64 BroadcastBytes 0
    uint64 BroadcastCount 0
    uint64 UnicastBytes 0
    uint64 UnicastCount 0
   }
   declare SendTraffic
   {
    uint64 BroadcastBytes 0
    uint64 BroadcastCount 0
    uint64 UnicastBytes 0
    uint64 UnicastCount 0
   }
  }
  declare SyslogSettings
  {
   string HostName $
   uint Port 0
   uint SaveType 0
  }
 }
 declare VirtualHUB
 {
  declare DEFAULT
  {
   uint64 CreatedTime 1362175953422
   byte HashedPassword +WzqGYrR3VYXrAhKPZLGEHcIwO8=
   uint64 LastCommTime 1362175953408
   uint64 LastLoginTime 1362175953408
   uint NumLogin 0
   bool Online true
   uint RadiusRetryInterval 0
   uint RadiusServerPort 1812
   string RadiusSuffixFilter $
   byte SecurePassword bpw3X/O5E8a6G6ccnl4uXmDtkwI=
   uint Type 0

   declare AccessList
   {
   }
   declare AdminOption
   {
    uint allow_hub_admin_change_option 0
    uint deny_bridge 0
    uint deny_change_user_password 0
    uint deny_empty_password 0
    uint deny_hub_admin_change_ext_option 0
    uint deny_qos 0
    uint deny_routing 0
    uint max_accesslists 0
    uint max_bitrates_download 0
    uint max_bitrates_upload 0
    uint max_groups 0
    uint max_multilogins_per_user 0
    uint max_sessions 0
    uint max_sessions_bridge 0
    uint max_sessions_client 0
    uint max_sessions_client_bridge_apply 0
    uint max_users 0
    uint no_access_list_include_file 0
    uint no_cascade 0
    uint no_change_access_control_list 0
    uint no_change_access_list 0
    uint no_change_admin_password 0
    uint no_change_cert_list 0
    uint no_change_crl_list 0
    uint no_change_groups 0
    uint no_change_log_config 0
    uint no_change_log_switch_type 0
    uint no_change_msg 0
    uint no_change_users 0
    uint no_delay_jitter_packet_loss 0
    uint no_delete_iptable 0
    uint no_delete_mactable 0
    uint no_disconnect_session 0
    uint no_enum_session 0
    uint no_offline 0
    uint no_online 0
    uint no_query_session 0
    uint no_read_log_file 0
    uint no_securenat 0
    uint no_securenat_enabledhcp 0
    uint no_securenat_enablenat 0
   }
   declare CascadeList
   {
   }
   declare LogSetting
   {
    uint PacketLogSwitchType 4
    uint PACKET_LOG_ARP 0
    uint PACKET_LOG_DHCP 1
    uint PACKET_LOG_ETHERNET 0
    uint PACKET_LOG_ICMP 0
    uint PACKET_LOG_IP 0
    uint PACKET_LOG_TCP 0
    uint PACKET_LOG_TCP_CONN 1
    uint PACKET_LOG_UDP 0
    bool SavePacketLog true
    bool SaveSecurityLog true
    uint SecurityLogSwitchType 4
   }
   declare Message
   {
   }
   declare Option
   {
    uint AccessListIncludeFileCacheLifetime 30
    uint AdjustTcpMssValue 0
    bool ApplyIPv4AccessListOnArpPacket false
    uint BroadcastStormDetectionThreshold 0
    uint ClientMinimumRequiredBuild 0
    bool DisableAdjustTcpMss false
    bool DisableCheckMacOnLocalBridge false
    bool DisableCorrectIpOffloadChecksum false
    bool DisableHttpParsing false
    bool DisableIPParsing false
    bool DisableKernelModeSecureNAT false
    bool DisableUdpAcceleration false
    bool DisableUdpFilterForLocalBridgeNic false
    bool DisableUserModeSecureNAT false
    bool FilterBPDU false
    bool FilterIPv4 false
    bool FilterIPv6 false
    bool FilterNonIP false
    bool FilterOSPF false
    bool FilterPPPoE false
    bool ManageOnlyLocalUnicastIPv6 true
    bool ManageOnlyPrivateIP true
    uint MaxSession 0
    bool NoArpPolling false
    bool NoDhcpPacketLogOutsideHub true
    bool NoEnum false
    bool NoIpTable false
    bool NoIPv4PacketLog false
    bool NoIPv6AddrPolling false
    bool NoIPv6DefaultRouterInRAWhenIPv6 true
    bool NoIPv6PacketLog false
    bool NoLookBPDUBridgeId false
    bool NoMacAddressLog true
    bool NoManageVlanId false
    bool NoSpinLockForPacketDelay false
    bool RemoveDefGwOnDhcpForLocalhost true
    uint RequiredClientId 0
    uint SecureNAT_MaxDnsSessionsPerIp 0
    uint SecureNAT_MaxIcmpSessionsPerIp 0
    uint SecureNAT_MaxTcpSessionsPerIp 0
    uint SecureNAT_MaxTcpSynSentPerIp 0
    uint SecureNAT_MaxUdpSessionsPerIp 0
    string VlanTypeId 0x8100
    bool YieldAfterStorePacket false
   }
   declare SecureNAT
   {
    bool Disabled true
    bool SaveLog true

    declare VirtualDhcpServer
    {
     string DhcpDnsServerAddress 192.168.30.1
     string DhcpDnsServerAddress2 0.0.0.0
     string DhcpDomainName sec.softether.co.jp
     bool DhcpEnabled true
     uint DhcpExpireTimeSpan 7200
     string DhcpGatewayAddress 192.168.30.1
     string DhcpLeaseIPEnd 192.168.30.200
     string DhcpLeaseIPStart 192.168.30.10
     string DhcpSubnetMask 255.255.255.0
    }
    declare VirtualHost
    {
     string VirtualHostIp 192.168.30.1
     string VirtualHostIpSubnetMask 255.255.255.0
     string VirtualHostMacAddress 00-AC-21-11-37-CB
    }
    declare VirtualRouter
    {
     bool NatEnabled true
     uint NatMtu 1500
     uint NatTcpTimeout 1800
     uint NatUdpTimeout 60
    }
   }
   declare SecurityAccountDatabase
   {
    declare CertList
    {
    }
    declare CrlList
    {
    }
    declare GroupList
    {
    }
    declare IPAccessControlList
    {
    }
    declare UserList
    {
    }
   }
   declare Traffic
   {
    declare RecvTraffic
    {
     uint64 BroadcastBytes 0
     uint64 BroadcastCount 0
     uint64 UnicastBytes 0
     uint64 UnicastCount 0
    }
    declare SendTraffic
    {
     uint64 BroadcastBytes 0
     uint64 BroadcastCount 0
     uint64 UnicastBytes 0
     uint64 UnicastCount 0
    }
   }
  }
 }
 declare VirtualLayer3SwitchList
 {
 }
 declare VPNGate
 {
  string Abuse $
  bool IsEnabled false
  bool LogPermanent false
  string Message $
  bool NoLog false
  string Owner PC26.sec.softether.co.jp's$20owner
 }
}
Data Structure of the Configuration File
The Configuration file defines new nodes in areas bounded by declare and can store several data models and nodes therein. Node name and data list schemas are determined, and non-compatible data structures are ignored. These ignored data structures are automatically deleted from the Configuration file so there is a chance that its contents can be significantly compromised if even one character is entered incorrectly when directly operated. This is why a backup needs to be made in advance if the Configuration file must be edited.
A list of the data models within the Configuration file is as follows.
| Data Model | Contents | Data Structure Size |
| uint | Unsigned 32-bit integer | 32-bit |
| uint64 | Unsigned 64-bit integer | 64-bit |
| bool | Bool | 1-bit |
| string | Unicode string (UTF-8 encoded) | 0-bit - unlimited |
| byte | Binary (Base 64-encoded) | 0-bit - unlimited |
The unrestricted area in the table below means within the scope of the architectural and memory limits.
| SoftEther VPN Project does not guarantee operation when directly rewriting the contents of the Configuration file. As such, we do not recommend directly rewriting the contents of the Configuration file using a text editor or the like. |
Replacing the Configuration File
When seeking to manually backup the contents of the Configuration file at a certain point to restore at a later date, the following procedure must be carried out when restoring the [vpn_server.config] file.
- Stop the VPN Server program completely if it is operating. A complete stop means ensuring that the vpnserver process is not operating.
- Replace the "vpn_server.config" file.
- Start the VPN Server program.
- Confirm that Configuration has been replaced correctly.
Transferring the Configuration File to Another Computer
Where a Configuration file has been created on the VPN Server of one computer, by copying its contents verbatim to another computer, it is possible to launch the VPN Server of the other computer using equivalent configuration information.
- Even if the operating systems and CPUs used for the copy source VPN Server and the copy destination VPN Server are different, the configuration information is copied verbatim and the compatibility of the Configuration file is maintained between the two. Note that functions only supported on the copy source system are not supported on the new system even if the Configuration file is copied.
- Transfer between computers is also possible even when the Configuration file is in binary format. Because the binary format Configuration file has undergone proper endian conversion so as not to rely on the type of CPU or OS, the system and machine architecture should not, in principal, affect operation.
Remotely Reading & Rewriting Configuration File Contents
The contents of the Configuration file (vpn_server.config) can normally not be obtained or changed without first logging into the computer running the VPN Server and opening it in text editor or connecting using file sharing and directly downloading and uploading said file.
However, the SoftEther VPN Server makes it possible for the overall VPN Server Administrators to remotely read and/or change the Configuration file at any time.
Clicking on [Edit Config.] in the VPN Server Manager displays the contents of the current VPN Server Configuration file. It is also possible to save the file in UTF-8 format. The same function can also be used to upload a Configuration file prepared on the Administrator's client terminal. When uploading and writing the Configuration file, the server function of the VPN Server automatically reboots and reads the contents of the new Configuration file. Manual rebooting or rebooting of the VPN Server process itself are not required. Upon completion of the reboot and Configuration file read, the VPN Server commences operation based on the contents of the new Configuration file.
The same task can be carried out using the vpncmd utility's [ConfigGet] and [ConfigSet] commands.
| When requesting the VPN Server to obtain the Configuration file by remote administration, the contents of the obtained files will always be in UTF-8 format text data even when, for instance, a [save_binary] file exists. In addition, issuing this request actually involves the VPN Server converting its internal status to text data upon receipt of the request process and returning it to the Administrator's terminal, rather than reading the vpn_server.config file on the local disk. This makes it possible to obtain the latest Configuration file data at any time. |
3.3.8 Configuration Version Numbers
Configuration Version Numbers
The contents of the VPN Server's Configuration file is automatically replaced in the following situations.
- When the configuration data of the VPN Server is changed as a result of the VPN Server or Virtual Hub Administrators performing tasks using the VPN Server Manager or vpncmd utility. When a new user is created or the settings are changed, for instance.
- When the statistical data such as communications traffic of the users or group, Virtual Hubs and VPN Server is updated, as explained in 3.3 VPN Server Administration.
While the contents of the Configuration file are replaced in the case of both 1 and 2 above, the renewed data in 1 is part of the VPN Server settings data and is thus essential by definition, while in 2, the renewed data is often not overly important. As such, by incrementing (increasing) the value of the Configuration file version information one at a time only when a change to the settings is carried out on the VPN Server, as is the case in 1, the System Administrator is able to know how many times the Configuration file settings have been modified.
When wishing to adopt a method of specifying an external script, for instance, when automatically backing up the Configuration file only when its settings have been changed (as in the case of 1), and not backing up when only statistical data has been updated (as is the case in 2), it is advisable to check the version information within the Configuration file each time, and if its value has increased on that of the previous check, to perform a backup of said file.
Location of the Configuration Version Number
The configuration version number is written in the upper part of the Configuration file by the [uint type] named [ConfigRevision].
declare root
{
  uint ConfigRevision 120

  :
: |
In the example above, it can be seen that the settings of the Configuration file have been changed 120 times since it was first created. The ConfigRevision value may increase by one each time the VPN Server is launched.
| The ConfigRevision value is only necessary for those System Administrators with a high level of knowledge writing programs to receive Configuration file settings change events and the like, and is not required for general users or Administrators. |
3.3.9 Configuration History
The contents of the Configuration file are created by the time and effort of the VPN Server and Virtual Hub Administrators and as such, are very valuable. A great deal of work is required in order to restore the settings of the Configuration file in the event of corruption due to a hardware or software bug, or becoming unable to be returned to its original settings due to erroneous settings changes.
That is why the VPN Server records the history of the Configuration file contents at regular intervals and automatically backs it up. The Configuration history backup is saved in the directory named backup.vpn_server.config which contains the Configuration file, with the time and date as its file name.
If the VPN Server settings information is corrupted or erroneous settings (such as deleting an important Virtual Hub) are performed, the most recently saved Configuration file backup can be restored manually. Please refer to the section in #3.3.7# entitled "Replacing the Configuration File" for details on how to restore the Configuration file.
A Configuration file backup is created automatically once every 60 minutes. However, as a general rule, no backup is created when there have not been any changes made to the contents of the Configuration file. In default, the backup folder is automatically protected using the same permission settings as the Configuration file.
| When automatic backups are not required, the backup function can be stopped by changing the permission settings to deny access to the backup.vpn_server.config directory to all parties. |
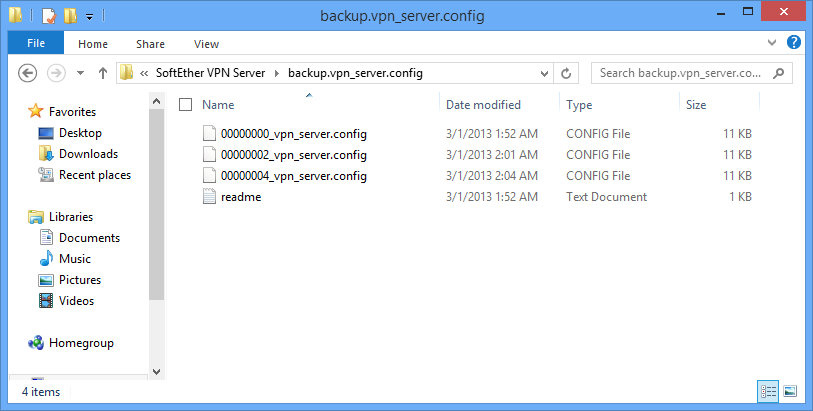
Automatically saved Configuration history.
3.3.10 Administration of Statistical Information
What is Statistical Information?
In addition to recording settings entries for the entire VPN Server settings, Virtual Hub and user groups settings, the configuration data administered by the VPN Server also records statistical information on each of these objects. Statistical information refers to the following types of data (differs depending on the object recorded).
- Outgoing unicast packets
- Outgoing unicast total size
- Outgoing broadcast packets
- Outgoing broadcast total size
- Incoming unicast packets
- Incoming unicast total size
- Incoming broadcast packets
- Incoming broadcast total size
- Time & date of last log-in
- Time & date of last communication
- Number of logins
The objects for which statistical data is administered are as follows.
- Entire VPN Server
- Virtual Hubs
- User objects
- Group objects
The above information is statistically processed by the VPN Server automatically and written as part of the Configuration file (the ConfigRevision value does not increase even if the statistical information alone is changed as previously stated).
The statistical information for the entire VPN Server can be read by overall System Administrators or a Virtual Hub Administrator. Statistical information on a Virtual Hub and its individual objects can only be read by an Administrator with Virtual Hub administration authority for that hub (including the overall System Administrators).
This information is fundamentally read only, and cannot be rewritten using the VPN Server Manager or vpncmd utility. It is technically possible however, to directly rewrite the Configuration file using a text editor.
Purposes of Statistical Information
The statistical information provides a range of information to the System Administrator such as how often the VPN Server and Virtual Hub users communicated, how many times they connected to the VPN Server and when the last connection and communication occurred.
This information makes the following possible.
- Obtaining information on and statistical processing of the frequency with which each Virtual Hub and user are using the VPN Server and the amount of data involved.
- Removal / invalidation of users not accessing the server for a given period of time and other administration tasks.
- ISP and other charges corresponding to the number of connections and communication data volume of the Virtual Hub hosting service.
- For those users whose login access is clearly large, the information can provide the first hints as to whether a user password has been stolen and a third party is accessing and using the server illegitimately.
- By using the vpncmd utility to automatically acquire differences in statistical information, it is possible to automatically create VPN Server usage information reports.
- To derive a sense of satisfaction from the knowledge that VPN Server which you worked so hard to set up is being used by many users to communicate large quantities of data.
Real Time Statistical Data
The VPN Server updates all statistical data in real time. This means that if a request to obtain statistical data from the VPN Server Manager or vpncmd utility occurs, then the latest up-to-the-minute statistical data can be acquired. Successively clicking on [Refresh] with the mouse in the VPN Server Manager GUI if the object in question is established clearly shows the values being constantly updated.
Acquiring Statistical Information
Statistical information can be displayed on the GUI window using the VPN Server Manager by selecting the VPN Server Virtual Hub user object and group object. It is also a simple task to acquire the Configuration file and process that mechanically. To obtain statistical information with the vpncmd utility, use the [ServerStatusGet], [StatusGet], [UserGet], and [GroupGet] commands.
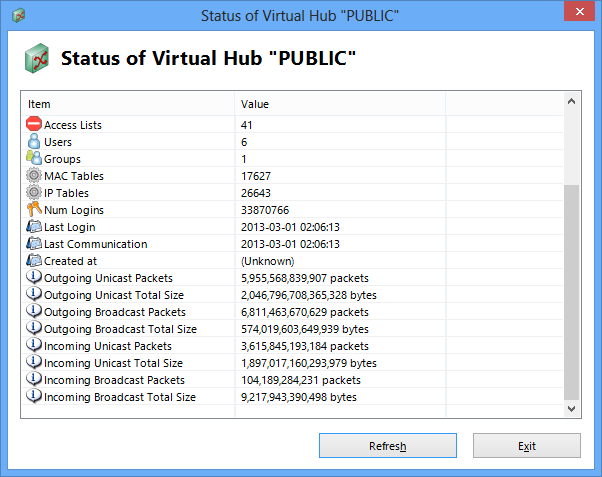
Virtual Hub statistical information window.
Obtaining Statistical Information on Entire Cluster during Cluster Configuration
When configuring a cluster from a plurality of VPN Servers, real time statistical information on the entire cluster is regularly gathered by the VPN Server which is the cluster controller. Therefore, when wishing to know the communication volume of the entire cluster during its configuration, establish an Administrator connection and acquire the necessary statistical information. The total values of the Virtual Hub and user/group statistical information can also be displayed in the cluster environment.
3.3.11 Automatic Adjustment when Disk Space is Insufficient
Contents of Log Files Written by the SoftEther VPN Server
The VPN Server writes the following files in the same directory as the vpnserver executable file or its subdirectory while running.
- VPN Server log files
- Security log and packet log files of each Virtual Hub
- Configuration history backup files
These log files and history files consume a large amount of disk space when the VPN Server has been operating over a long period. However, log files created by the VPN Server should not be erased indiscriminately because data from the VPN Server log, Virtual Hub packet log and security log is crucial when examining the causes of unauthorized access and other trouble.
In this case, the VPN Server Administrator should automatically backup the log files to external media (DVD-R, tape, etc.) starting with the oldest and store these backups before removing them from the hard disk. It is also possible to automate their processing.
Security Risks Posed by Insufficient Disk Space
However, when not carrying out the above processing or when forgetting to back up or delete old log data, disk space becomes constricted and eventually reaches 0 bytes. When available disk space reaches 0 bytes, the VPN Server becomes unable to write new log data onto the disk. This situation represents a major risk to security because an intruder can commit any type of attack they please and it will not be recorded on the log so the VPN Server Administrator has no way of knowing later on that an attack has taken place.
To counter this risk, the SoftEther VPN Server incorporates a feature whereby all of the log files and configuration files written by the VPN Server are automatically deleted starting from the oldest file whenever the available disk space falls below a preset level due to constriction of disk space caused by a large amount of saved log files and history files. By deleting old log files of less importance, it is possible to continually ensure a prescribed amount of available disk space thereby maintaining the ability to write log files as much as possible. By taking advantage of this function of automatically deleting old log files to keep disk space above a certain level, it is possible to realize maintenance free operation even when not performing the administrative task of backing up and deleting old log files.
| This function is a type of fail safe function set up in order to prevent the worst case situation of the VPN Server not being able to write new log files due to a shortage of available hard disk space. Despite this function, we still recommend constantly backing up all log files on the VPN Server computer written by the SoftEther VPN Server to a safe place such as external media. |
Minimum Disk Space Settings Values
The VPN Server is set by default to delete old log files starting with the oldest until the space available on the drive to which the log files are being written is restored to 100MB or greater (104, 857,600 bytes to be precise).
This value can be modified arbitrarily by changing the [AutoDeleteCheckDiskFreeSpaceMin] value located in the [ServerConfiguration] node within the Configuration file. It should be noted that the minimum value is 1MB (precisely 1,048,576 bytes) and it is not possible to set a value below this. Please refer to the area below for details.
declare ServerConfiguration
{
	uint64 AutoDeleteCheckDiskFreeSpaceMin 104857600
	uint AutoSaveConfigSpan 300
	string CipherName RC4-MD5
	bool DisableDosProction false
	:
: |
- The VPN Server obtains the available disk space for saving the log files by calling up the operating system's API.
- On Windows 2000 or later OS versions where a disk quota is set in relation to the account running the VPN Server, this disk quota's allocated space is used as the available disk space. For Linux and UNIX systems, the disk quota space is not utilized. Therefore, please note that there is a high probability that the automatic disk space adjustment function is not working properly when the disk quota is set on UNIX systems.
3.3.12 Failure Recovery
The SoftEther VPN Server attempts automatic recovery of failures occurring during the operation of the VPN Server as far as possible using the following methods.
Program Error Failure Recovery
The Windows and Linux operating systems on which the SoftEther VPN Server program and the VPN Server rely are carefully designed and implemented to realize a high level of reliability and stability, and the number of errors which exist within their programs are very few. However, it is impossible to guarantee above a certain extent that errors will definitely not occur in any program, so System Administrators should always consider what measures to take in the event that a serious error occurs. Even assuming that the problem does not lie with the software, consideration should also be given to potential hardware defects. For instance, it cannot be said with any certainty that the error is not caused by the memory module or a mistaken calculation by the CPU.
In many cases where there is software or hardware defect, errors occur which are either difficult or impossible to repair such as a memory access violation, calling up an unknown directive or an unauthorized interrupt.
Whenever these program errors occur, the VPN Server immediately terminates the VPN Server process and discards the process memory. It then re-launches the process, re-reads the contents of the Configuration file and attempts to continue operation. These processes are typically carried out in an instant (from a few milliseconds to a few seconds) so, on the whole, there is no significant disturbance to the VPN Server. This means that when an irreparable error occurs in the user's memory space, the VPN Server program attempts failure recovery automatically, thereby eliminating the need for the VPN Server Administrator to notice the error and re-launch the VPN Server process and so on.
| Still, self repair may not work properly in special cases where the contents of the program error are very serious and the code of the portion to re-launch the VPN Server process has been dumped, or when the cause of the error stems from the current contents of the VPN Server's configuration such that an error occurs for a similar reason even when launched the next time around (which is especially likely to occur when the Configuration file has been manually re-written). In addition, recovery is not possible when a critical error occurs within the kernel-mode code being called by the VPN Server, wherein a blue window appears for a Windows OS or a Kernel Panic message is displayed in the case of UNIX, but both necessitating a reboot of the entire computer system. The failure recovery is a function for critical errors which occur in the user's space from which recovery is possible, and does not possess qualities which eliminate the need for a system to monitor the operating status of external servers. |
Moreover, there is a possibility that this function will not operate when the Windows version SoftEther VPN Server is launched in Service Mode.
Protecting Configuration Data & Failure Recovery when Hardware Failure Occurs
If a hardware failure (such as a sudden power outage) occurs when the VPN Server program is attempting to write physical data to the Configuration file, the physical contents of the Configuration file may be damaged. In preparation for such an occurrence, the VPN Server always carries out a duplicate procedure when writing the Configuration file.
First, it physically leaves the contents of the Configuration file on the disk, then it writes the contents of the new Configuration file onto the disk. Once the write processing is complete, it issues a command to the OS's write buffer to flash and goes on standby until the data write is committed to physical disk. After the physical data is committed, the old configuration data is then deleted. These processes are carried out in a location of which the user is completely unaware.
When there is a chance that the Configuration file will be damaged upon the next launch, an attempt is made to repair the contents of the configuration using the data from the prior configuration backed up in the log immediately before writing the damaged Configuration file. In most cases, this is successful and the contents of the configuration are restored. These processes are performed automatically the next time the system is restored, so the System Administrator does not have to perform them manually.
When this automatic failure recovery function does not work properly, the VPN Server's Administrators must manually roll back to the previous Configuration file from the Configuration file's backup directory. This function may also not work properly depending on the specifications of the operating system and file system.
Configuration File Automatic Save
The VPN Server automatically saves the Configuration file (note that no automatic save occurs when there has been no change whatsoever to the information contained in the Configuration file including the statistical information). This means that it is possible to restore to the configuration at the time of the previous automatic save even when the VPN Server process suddenly terminates abnormally instead of shutting down normally.
The default interval for the automatic save is 300 seconds. This automatic save interval can be modified by rewriting the [AutoSaveConfigSpan] value in the [ServerConfiguration] node inside the Configuration file. Please refer to the area below for details.
declare ServerConfiguration
{
	uint64 AutoDeleteCheckDiskFreeSpaceMin 104857600
	uint AutoSaveConfigSpan 300
	string CipherName RC4-MD5
	bool DisableDosProction false
	:
: |
Automatic Defense against DoS Attack
Whenever the TCP/IP listener ports disclosed to the network by the VPN Server are connected to a public IP network such as the Internet, they are constantly vulnerable to attack from Internet hosts. The most dangerous attack is called SYN Flood, a type of DoS attack ("Denial-of-service" attack) which sends a massive amount of connection requests to the TCP/IP port.
Many operating systems are equipped with measures to defend against an attack from SYN Flood. The SYN Flood attack can also be blocked on a network by firewalls and IDP (Intrusion Detection & Prevention). However, the TCP/IP connection requests will reach the VPN Server in the event that these mechanisms do not work properly or the settings thresholds are too large.
When the VPN Server tries to process a large amount of incoming TCP/IP connection requests, a large amount of system resources are required. That is why the VPN Server is designed to detect when a SYN packet responsible for sending requests from an identical source arrives at a listener port and discards that connection immediately before processing to receive it begins. This is the VPN Server's automatic defense function for dealing with DoS attacks. This function is enabled in default mode.
This function can be disabled by rewriting the [DisableDosProction] value within the [ServerConfiguration] node in the Configuration file to [true]. The specific settings are as follows.
declare ServerConfiguration
{
	uint64 AutoDeleteCheckDiskFreeSpaceMin 104857600
	uint AutoSaveConfigSpan 30
	string CipherName RC4-MD5
	bool DisableDosProction true
	:
	:
|
3.3.13 Keep Alive Internet Connection Function
In order to enable the computer on which the VPN Server is installed to respond to a VPN connection request from the Internet at any time, the VPN Server integrates a function to constantly send packets to the Internet whenever it is operating. This function makes it possible for VPN client computers to connect to the VPN Server over the Internet at any time by constantly maintaining the server computer's connection to the Internet without the line ever disconnecting, even in environments using some ISDN, PHS and ADSL lines for their Internet connection, which disconnect when there has been no communication for a certain period of time.
The Keep Alive Internet Connection Function allows TCP/IP or UDP/IP packets to be sent to a designated host port number at prescribed intervals. The data size of these packets is extremely small and their contents are generated using random numbers.
The Keep Alive Internet Connection Function is enabled by default, and employs the following connection setting values.
| Entry | Initial setting values |
| Host | keepalive.softether.org |
| Host number | 80 |
| Packet Send interval | 50 seconds |
| Protocol | UDP/IP Protocol |
To modify the Keep Alive Internet Connection function's settings, open the [Encryption & Network] in the VPN Server Manager, then click [Keep Alive Internet connection function] and enter the settings in the relevant boxes. In the vpncmd utility, the same tasks can be carried out using the [KeepEnable], [KeepDisable], [KeepSet] and [KeepGet] commands.
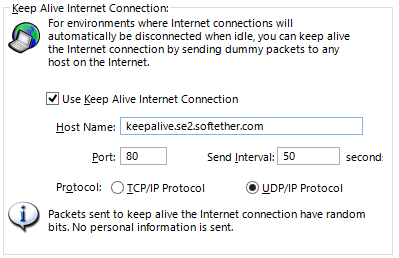
Keep Alive Internet connection function settings window.
3.3.14 Obtaining Server Information
Obtaining Server Status
The current dynamic status of the VPN Server can be obtained by clicking on [View server status] in the VPN Server Manager. In the vpncmd utility, use the [ServerStatusGet] command.

Server status window.
The displayed items are as follows.
| Entry | Contents |
| Server Type | Usually a [Stand-Alone Server]. When using the cluster function, this becomes either a [cluster controller] or [cluster member server]. |
| Number of TCP Connections | The VPN Server displays the total value of all TCP Connections connected as VPN sessions and administration sessions. For the cluster controller, the total value of all TCP connections for all other cluster members is displayed in addition to two other items, namely [This server's TCP connections] and [Other cluster member's TCP connections]. |
| Number of Virtual Hubs | Displays the total number of Virtual Hubs operating on the VPN Server. For the cluster controller, the total number of Virtual Hubs defined in the cluster is displayed, while for the cluster member server, the individual number of Virtual Hubs for which an instance currently exists inside that server is displayed. In addition, both the number of [Static Virtual Hubs] and [Dynamic Virtual Hubs] are displayed for the cluster environment. |
| Number of Sessions | Displays the number of VPN sessions currently connected to the VPN Server. The total number of connected sessions for the entire cluster is displayed for the cluster controller, as well as [This server's sessions] and [Other cluster member's server sessions]. |
| MAC Address Tables | Displays the total number of MAC Address Tables within all Virtual Hubs administered by the VPN Server. The total number of all MAC Address Tables administered by the VPN Server within clusters is displayed for the cluster controller. |
| Number of IP Address Tables | Displays the total number of IP address tables within all Virtual Hubs administered by the VPN Server. The total number of all IP address tables administered by the VPN Server within clusters is displayed for the Cluster Controller. |
| Number of Users | Displays the total number of user objects defined within all Virtual Hubs administered by the VPN Server. The cluster member server always displays 0 because it does not hold any user databases. |
| Number of Groups | Displays the total number of group objects defined within all Virtual Hubs administered by the VPN Server. The Cluster Member Server always displays 0 because it does not hold any group databases. |
| Statistical Information | Displays statistical information on the communication volume to date. |
| Server Start Time | Displays the time that the VPN Server was launched. |
| Current Time | Displays the current time of the VPN Server computer. Converts to local time when displayed. |
| 64-bit High Precision Logical System Clock | Displays the 64-bit time data administered internally by the VPN Server. |
| Memory Usage Status | Displays the usage status of both the physical and virtual memory of the computer running the VPN Server. This can only be displayed on Windows operating systems. |
VPN Server Information
Static information on the VPN Server can be obtained by clicking on [SoftEther VPN Server information] in the VPN Server Manager. In the vpncmd utility, use the [ServerInfoGet] command.
VPN Server static information displays information on the VPN Server version and the product name's operating system as well as a list of functions and list of specifications which are currently available on the server. The maximum simultaneous number of connections, for instance, is also shown here.
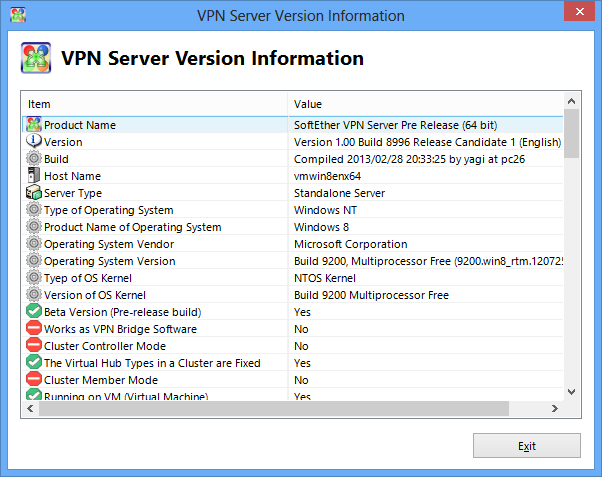
VPN Server information window.
3.3.15 Selecting Encryption Algorithms for use in SSL Transmission
The VPN Server sets the RC4-MD5 algorithm as the default encryption and electronic signature algorithm for use in SSL transmission. It is also possible to select other algorithm.
Opening [Encryption & Networks] in the VPN Server Manager, then selecting from the [Encryption algorithm Name] drop down box. In the vpncmd utility, use the [ServerCipherSet] command.
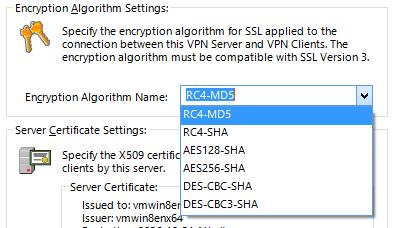
Selection window for SSL transmission encryption algorithms.
3.3.16 Initializing the VPN Server Service Reboot & Configuration Information
The VPN Server can be remotely rebooted. However, there is no command in the VPN Server Manager equivalent to a reboot command. Instead, it is necessary to use the [Reboot] command in the vpncmd utility in order to remotely reboot the VPN Server.
Designating Reboot /RESETCONFIG:YES restarts the VPN Server in its initial condition by deleting the contents of the current Configuration file upon rebooting.
3.3.17 Syslog Transmission Function
Where the VPN Server's Syslog Transmission function can be used, it is possible to send the contents of the entire VPN Server's administration log or each Virtual Hub's security and packet logs to external syslog servers using the syslog protocol, which is a standard log delivery protocol.
Normally, each of the VPN Server's logs are recorded on the disk as files but using the Syslog Transmission function enables the System Administrator to consolidate log administration thereby reducing administration costs. The function can also send out alerts when specific log contents are generated in the software of the syslog receiver.
The Syslog Transmission function is set to off in default mode, and can be activated by accessing the [Encryption and communication settings] in the VPN Server Manager. In the vpncmd utility, use the [SyslogEnable] command or the [SyslogDisable].
Once the Syslog Transmission function is activated, the sent logs are no longer saved on the local hard disk. Therefore, please be aware that when the syslog server does not launch or when problems arise between the communicating syslog servers, or when the processing capacity of the syslog server and any intermediate networks or protocol stacks is insufficient, the contents of these logs which should essentially be saved will instead be lost, regardless of whether the syslog function is enabled.

Syslog Transmission function settings window.
3.3.18 Restricting by IP Address of Remote Administration Connection Source IPs
Ensuring Security by Limiting Administration Connection Sources
The SoftEther VPN Server enables remote administration (Server Administration Manager and vpncmd utilities) via a network. As described in 3.3 VPN Server Administration, there are two types of remote administration, i.e. entire VPN Server administration mode and individual Virtual Hub administration mode.
In order to prevent unauthorized users from connecting to the VPN Server and performing administration tasks, the VPN Server is protected by two passwords, one for connection to the entire VPN Server Administration Mode and the other for connection to individual Virtual Hub Administration Mode. However, password protection alone may not always be sufficient to protect against unauthorized administration access. For this reason, access can be limited to those administration connection sources with a pre-designated IP address.
By creating a text file named [adminip.txt] on the directory on which the VPN Server is installed (the directory containing the vpnserver executable files) and performing a suitable description on said text file, it is possible to set IP addresses which permit access to the entire VPN Server or to each of the Virtual Hubs from the Server Administration Manager or vpncmd utility.
| Create the [adminip.txt] file on the same directory as the vpnserver program. Rewriting of this file is recognized by the vpnserver in real time so the VPN Server does not have to be re-launched after setting up the file or rewriting its contents (the set contents are automatically reflected). When an adminip.txt file does not exist, the IP addresses of administration connection sources are not filtered so administration access is permitted for all IP addresses (no adminip.txt file exists in default). |
How to Write adminip.txt Files
The adminip.txt file should contain one rule per line. When end of a line starts with # or //, the line is treated as a comment and is ignored. When an adminip.txt file exists, all source IP addresses are denied administration access in default. Write the source IP addresses for which administration access is to be granted in the adminip.txt file, with one IP address to each line.
Designating Source IP Addresses for each Virtual Hub in Virtual Hub Administration Mode
Write each IP address one per line followed by a space of more than one character using either the space or tab character, then insert the name of the Virtual Hub to which administration access from said IP address is to be permitted.
For example, granting administration access to Virtual Hub "HUB1" from two IP addresses 192.168.3.10 and 130.158.87.87, and to Virtual Hub "HUB2" from IP address 61.197.235.210 would be described as follows.
192.168.3.10 HUB1 130.158.87.87 HUB1 61.197.235.210 HUB2 |
Inserting * (asterisk mark) in place of the IP address matches all source IP addresses to that line. In other words, administration access in Virtual Hub Administration Mode to HUB3 as described below is permitted for all of the source IP addresses.
192.168.3.10 HUB1 130.158.87.87 HUB1 61.197.235.210 HUB2 * |
Designating Source IP Addresses in Entire Virtual Hub Administration Mode
Writing only the IP addresses on each line allows administration access to the entire VPN Server and all of the Virtual Hubs from that IP address. In the following description, for instance, IP address 192.168.10.10 is the only source IP address from which administration access is possible in entire VPN Server Administration Mode. Furthermore, 192.168.10.10 is the only address from which administration access is possible for all Virtual Hubs.
192.168.10.10 192.168.3.10 HUB1 130.158.87.87 HUB1 61.197.235.210 HUB2 * HUB3 |
adminip.txt File Permission
The adminip.txt file is saved with the appropriate permissions. For example, when general users are able to log onto the VPN Server computer in addition to System Administrators, sufficient precautions should be taken to prevent these other users from rewriting the adminip.txt file.
See Also
- 2.4 VPN Server Manager
- 2.6 VPN Command Line Management Utility (vpncmd)
- 3.4 Virtual Hub Functions
- 3.5 Virtual Hub Security Features
- 6. Command Line Management Utility Manual
- 6.3.2 "ServerInfoGet": Get server information
- 6.3.3 "ServerStatusGet": Get Current Server Status
- 6.3.4 "ListenerCreate": Create New TCP Listener
- 6.3.5 "ListenerDelete": Delete TCP Listener
- 6.3.6 "ListenerList": Get List of TCP Listeners
- 6.3.7 "ListenerEnable": Begin TCP Listener Operation
- 6.3.8 "ListenerDisable": Stop TCP Listener Operation
- 6.3.9 "ServerPasswordSet": Set VPN Server Administrator Password
- 6.3.11 "ClusterSettingStandalone": Set VPN Server Type as Standalone
- 6.3.20 "ServerCertSet": Set SSL Certificate and Private Key of VPN Server
- 6.3.22 "ServerCipherSet": Set the Encrypted Algorithm Used for VPN Communication.
- 6.3.26 "KeepEnable": Enable the Keep Alive Internet Connection Function
- 6.3.27 "KeepDisable": Disable the Keep Alive Internet Connection Function
- 6.3.28 "KeepSet": Set the Keep Alive Internet Connection Function
- 6.3.30 "SyslogEnable": Set syslog Send Function
- 6.3.31 "SyslogDisable": Disable syslog Send Function
- 6.3.32 "SyslogGet": Get syslog Send Function
- 6.3.41 "Reboot": Reboot VPN Server Service
- 6.3.42 "ConfigGet": Get the current configuration of the VPN Server
- 6.3.43 "ConfigSet": Write Configuration File to VPN Server
- 6.3.62 "HubSetDynamic": Change Virtual Hub Type to Dynamic Virtual Hub
- 6.3.77 "SstpEnable": Enable / Disable Microsoft SSTP VPN Clone Server Function